I think we’ve all had an incident of one-sided jaw pain at some point, where it’s difficult to open and close the jaw without experiencing sharp pain. I’m not referring to chronic TMJ pain related to malocclusion (called TMD—temporomandibular joint dysfunction); I’m referring to those isolated incidents that happen to everyone on occasion. This condition can be caused by chewing hard/tough food requiring stronger than usual jaw muscle contraction; chewing a large piece of food on one side of your jaw; teeth grinding, and of course trauma to the jaw such as from boxing and other contact sports. The TMJ can also be misaligned from rear-end collision car accidents (acceleration-deceleration), as the force of impact is enough to violently hyper extend and flex the TMJ. Some cases of sudden onset TMJ pain self-resolve, but in other cases it can last for weeks, which can obviously be a nuisance as chewing food becomes uncomfortable.
The jaw, or temporomandibular joint is classified as a synovial, condylar joint. Joints are named after the two bones that comprise it, so the TMJ is formed by the articulation of the mandibular fossa (depression/pit) of the left and right temporal bones of the skull and the left and right condylar heads of the mandible (lower jaw), hence temporomandibular joint. It could have been named the “mandibulotemporal joint,” or MTJ, but someone long ago decided temporomandibular sounded better.
TMJ movement is very complex, involving flexion, extension, rotation, translation and oblique movements. These movements are accomplished by varying- magnitude, combined contractions of the temporalis, masseter, medial pterygoid and lateral ptergoid muscles controlled by the central nervous system, including nuclei in the brainstem. So, the simple act of chewing is neurologically complex; perhaps the most complex out of all the joints in the body.
Synovial means that the joint is encapsulated by ligaments and has an inner tissue lining called synovium that produces synovial fluid, a clear viscous fluid that reduces friction in the joint, very much like how motor oil reduces friction between a car engine’s cylinders and pistons. Not all joints are synovial, such as the acromioclavicular (AC) joint of the shoulder which is a fibrous joint; only the joints that are tasked to move frequently and have a comparatively larger range of motion i.e. knees, hips, shoulders, fingers, etc. The TMJ also has an articular disc, a thin slip of tissue that sits between the mandibular heads and temporal bone that provides cushioning/ shock absorption. Since the TMJ is a heavily used joint, nature added this extra protection. Just imagine the number of times the TMJ extends and flexes (opens and closes) in a typical day, from talking and eating!
So what is going on when you have one-sided jaw pain when you previously didn’t? The answer is that the jaw is slightly misaligned and the resultant, abnormal movement is pulling excessively on the soft tissues of the affected side and/or the condyle is pressing against the mandibular fossa excessively, firing surrounding nerve endings. Muscle spasm reflex of any of the aforementioned jaw movement muscles may also be contributing to the pain by maintaining the misalignment in place. TMJ misalignment is typically subtle and not usually visible, but sometimes you can see it if you open your mouth in front of a mirror. If you notice your mouth opening forms a tilted oval shape as opposed to an even oval shape, it means your mandible is deviating to one side due to TMJ misalignment. Usually, the mandible deviates to the same side of the misalignment/jaw pain, but not always.
To restore alignment and balance to your TMJ, try this:
Relax your jaw. This may sound easy, but for some people, especially those who subconsciously tend to clench their jaw, it is not. Just concentrate on your jaw and facial muscles, commanding them to let go. Your mandible should drop slightly so that your teeth are not touching at all.
Next, with your jaw still relaxed, using the palm of your hand on the side opposite to the painful side of your jaw, tap the opposite side of the jaw (the side of the jaw bone, not directly on the joint itself) firmly three times. Pause for ten seconds, then do it again. Wait for a couple more seconds, and see if you notice reduced pain. If pain is less, it means the TMJ settled back into alignment and the pain should start to go away and should be gone in about an hour or two. If not, tap obliquely at an upward angle towards the affected joint, then re-evaluate. If you notice the pain lessens, then that’s it—just wait a little longer, and the pain will disappear and your jaw will be back to normal.
If there is no change, try this: with your jaw still relaxed place your hand to the sides of your face with the tips of your index fingers directly on top of the protuberances of the condylar heads of the mandible and your thumbs cradling the back of the jaw bone (ramus). Alternately press gently inwards with your index fingers for a total of six times (three on each side). Then, using your thumbs gently pull the jaw forward three times. You can also gently push your jaw side to side alternating sides, three times per side. I need to emphasize that you must keep your jaw totally relaxed while you do this; otherwise it may not work.
Watch this video where I demonstrate these simple moves:
If you find that you get one-sided TMJ pain quite often, you may have malocclusion of your bite. Make sure to see your dentist/ orthodontist.
Sometimes TMJ can trigger headaches. If you have both, fixing the TMJ misalignment is likely to fix your headaches.
Do you notice that it takes more effort than before to do simple things like run, squat, or get out of your car? You can still do them, but not as fast and springy as when you were younger. If you’re over age 40, it’s likely you can identify with this.
The inevitable reality of being mortal is that our body starts to deteriorate after maturity, which is around age 21. For those who “age well” the deterioration rate progresses slowly and is hardly perceptible until the later years; for those who do not age well, the changes can occur relatively fast and are obvious.
The main musculoskeletal changes associated with aging are:
Muscle atrophy, especially in the upper leg and glutes
Decreased muscular strength and endurance
Decreased cardiovascular endurance
Decreased ligament and tendon elasticity
Decreased joint cartilage thickness and suppleness
Increased body fat percentage
The focus of this article and following ones will be on slowing down the gradual breakdown of the musculoskeletal system via exercises, stretches, diet, new habits and routines and other lifestyle modifications. Yes, slowing down the aging process and extending your “full functional” years is very possible if you have a good plan, and diligently stick to it. In other words, start developing good wellness/ life extension habits if you haven’t done so already.
In this article, the topic is joints. I previously wrote about the importance of keeping your joints strong by doing specific joint exercises during your workouts. This discussion is on doing daily joint stretches to counter the degenerative forces that come with aging.
One of things most people first notice as a sign of getting older is decreased ability to absorb and rebound from external forces and mechanical stress. You start to notice that it takes a bit longer to jump up from a seated position and get up after falling. You find it more difficult to bend, squat and maintain other awkward body positions. If you trip and fall to the ground, it takes more effort to get back up. And, when running you notice that you can feel the shock in your knees more, and therefore do not run as long, or give it up entirely. The reasons for this are decreased muscle strength, decreased ligament and tendon elasticity, and most of all, thinning cartilage in the weight-bearing joints. It takes more energy and effort to do these things because your body “hardware” has lost some of its youthful, structural integrity. Your mindset /motivation to move may be unchanged but your body isn’t responding as quickly and strongly.
As you get older, the cartilage lining your synovial joints (the joints encapsulated by ligaments) loses fluid content. To compound matters, when you are past the age of 40, human growth hormone (HGH) secretion by your pituitary gland practically ceases. HGH is the “fountain of youth” hormone that is largely responsible for the features associated with youth: energy, high metabolism, supple skin, thicker muscles and thicker, bouncier cartilage. It’s why younger people can bounce right back up after falling down, making it look effortless.
If you are over the age of 50 and your occupation or recreational interests involved placing pressure on your feet, knees, hips, spine, shoulders, elbows or hands chances are you are experiencing aches and stiffness. Your age, plus your history are not doing your weight bearing joints any favors. So what can you do?
If you are over the age of 40 and feel the slightest stiffness in your joints, I highly advise you start a daily routine to keep your cartilage healthy. Your goal is to effectively counter the natural progression of osteoarthritis—the disease that involves advanced thinning of cartilage, bone-on-bone contact, and resultant chronic inflammation and joint dysfunction (stiffness, pain, reduced range of motion). It plagues millions of people over the age of 50. Practically all former football players have osteoarthritis.
By investing just a couple of minutes a day every day, you can literally save yourself years of pain down the road, and perhaps preclude the need to take harmful anti-inflammatory medications and even the need to get knee and/or hip replacement surgery. Instead of pain, you will be able to squeeze out a decade or more of pain-free movement. That is a huge, quality of life issue because most of the enjoyable things in life require some degree of physical fitness—walking, bending, lifting etc. and joint pain can severely restrict your ability to engage in these activities.
In my view, in order for a preventive measure to be feasible, it must meet the following criteria:
It must be practical, with minimal preparation required
It must be realistic – no super-human feats required
It must address the problem and have close to immediate results
Here is the basic routine that I personally do every day to guard against cartilage deterioration. I will update this post with a video that illustrates these exercises, but for now, here is the description so that you can get started right away:
Arm propellers – slowly and with focused intent, make large circles with your arms, with the left arm moving counter-clockwise and the right arm clockwise, crossing in front. Keep the angle of your upper arm about 30 degrees relative to the coronal plane of your shoulder to avoid jamming your shoulder joints. Do about 20 rotations, and then reverse directions of both arms.
This exercise moves the glenohumeral (GH) joint, where your upper arm (humerus) articulates with your scapula. Many people don’t realize that in a typical day, they rarely raise their arms above shoulder level. This prevents areas of the GH joint to get proper lubrication, causing the cartilage to “dry out.” This exercise exposes all parts of the cartilaginous-lined humeral head to synovial fluid, the “motor oil” of joints and even stimulates production of it. The rigorous movement also stimulates lubricin production, a compound that further reduces friction inside the joint.
Elbow propellers – similar to the arm propellers, rotate your lower arm (forearms) in opposite circles by keeping your upper arm relatively stationary so that most of the movement is at the elbow joint. There is some movement in the GH joint, but also some in the radio-ulnar and humero-ulnar joint. Do 20; reverse directions.
Wrist stretches – interlace fingers as if to pray, then alternately pronate and supinate the hands while making a circular motion, stretching the wrist joints in all directions.
Finger flexion and extension – make loose fists with both hands, and then unfold the fists segmentally (extend the fingers) first at the metacarpal-phalangeal joints (knuckles), then proximal interphalangeal joints, and then the distal interphalangeal joints until your hands are flat, fingers fully extended. Then, reverse the process (flex the fingers segmentally) back into a fist. Repeat about ten times.
Collarbone stretches – this mobilizes the sternoclavicular (SC) joint, where the proximal clavicle articulates with the sternum (breast bone). The joints are identified by the two, large bony protuberances at the base of the neck. For this exercise, make a shortened swimming stroke with your arm: bring it backwards, raise it up for the stroke and with elbow bent about 90 degrees, make a big scooping motion downwards, reaching all the way back (palm of hand should be facing upwards), and then supinate your forearm and repeat the motion. You will probably hear some grinding noises in your SC joint as it moves. Do about 10 repetitions; switch sides.
Torso circles – This nicely moves the joints of the lumbar spine in a stirring motion—the facet joints and the intervertebral discs, forcing their hydration. Place feet about two feet apart and place your hands on the sides of your pelvis. Hinge at the hip joints (bend torso forward and down, being careful to contract your back muscles for support) and then move your torso in a large, counter-clockwise circle reaching the maximum lumbar active range of motion in all directions of the circle. Do ten circles; reverse directions.
Lumbar extensions – I recommend doing these especially if your job involves prolonged hours of sitting, such as a desk worker, airline pilot, or truck driver. Sitting flexes your lumbar spine, which encourages posterior disc migration, a risk for herniated discs. Simply place the palms of your hands behind you, just below your waistline. Then, lean backwards and bend over your hands (try to keep them stationary in space), arching your back and hold for two seconds. You should feel tightness in your low back. If not, bend back some more. Return to neutral. Do 10 repetitions.
Hula hoops – this targets your hip joints by moving your pelvic bowl around the femur heads. With feet shoulder length apart and hands on your sides, make big circles with your pelvis like a hula hoop motion. You should feel your hip joints moving even though your legs are stationary. By doing this, you bathe all areas of the femur heads and stimulate synovial fluid production.
Knee circles – the knees move mainly as a hinge joint (flexion and extension) but there is some ability to rotate and translate (move in a circular motion and side to side motion). With feet together touching, bend your knees bout 30 degrees and place your hands around them. Move your knees together in a clockwise direction 20 times; reverse direction.
Ankle circles – point your toes to the ground, and flex them against the ground by placing light, downward pressure. Then, move your ankle in a clockwise direction keeping your toes in place. This moves the many articulation points of the ankle, as well as the joints of the forefoot: metatarsal-phalangeal joints and interphalangeal joints.
BOTTOM LINE: As you age, your joint cartilage loses its fluid content and starts to get stiffer. If the joint doesn’t get much movement, it compounds the problem. You can arrest this process by diligently doing these exercises to ensure all your joints are tasked to move, which signals the body to produce more joint fluids.
Whole BodyCryotherapy (WBC) is starting to trend in the health and wellness arena. As a big proponent of non-medical self-care methods to achieve and maintain health, it piqued my interest when I first encountered it. No, it’s not a place that uses crying as a form of emotional therapy, as the name could suggest. Cryotherapy is the application of cold to the body for therapeutic effect. It is one of the two, basic modalities that have been used for centuries to reduce pain; the other, of course, being heat. Ice packs, ice baths, ice massages and frozen hand-held metal applicators are common ways to apply cryotherapy. Ice is 0⁰ Celsius (32⁰ F) so when it contacts your skin, which is about 91⁰ F plus or minus a couple of degrees depending on the outside temperature, heat flows out of your body since energy flows from high concentration to low (diffuses). It is the movement of heat out of your body that the brain perceives as cold (it is not “cold” moving into your skin).
But what happens if instead of 0⁰ C, you exposed your skin to -100⁰C (-148⁰ F)? That is what a cryotherapy center offers, and will be the focus of this article.
Does Cryotherapy Work for Pain?
We already have a good understanding of what happens when human tissue is exposed to such extreme cold temperature, since cryotherapy has been around for decades. Cryosurgery, a form of cryotherapy, is highly focused cold using liquid nitrogen or argon gas to treat dermatological conditions such as warts and benign tumors, as well as cancerous tumors of the liver, kidneys, bones, lungs and breasts. It is also used for anesthetic purposes to deaden irritated nerves. Since human cells are about 75% water, when you apply sub-zero temperature to them the water crystallizes and denatures the cells, effectively killing them. The body then replaces the dead tissue with new cells. Cryotherapy centers, however, do not offer cryosurgery. They apply extreme cold to the whole body not to kill cells, but to “shock” the body’s central nervous system, causing it to initiate physiological processes that benefit pain reduction and tissue healing (explained later).
There are many studies in the medical literature that support the use of cryotherapy for inflammation and pain. In one study, patients suffering from adhesive capsulitis of the shoulder were randomly divided into two groups. One group had whole body cryotherapy along with physical therhapy (PT), and the other only PT. The results showed that while both groups improved, the group receiving WBC plus PT experienced significantly greater improvement in shoulder range of motion, subjective pain, and functionality.1
Another study examined the effects of WBC on fibromyalgia, a systemic condition that involves heightened sensitivity to pain throughout the body. In the 100 person study, fibromyalgic patients treated with cryotherapy reported a more pronounced improvement of the quality of life compared to the non-treated subjects, as indicated by their scores on qualitative indexes (questionnaireson functionality/ quality of life). The researchers speculate that the positive result was due to cryotherapy’s effect on reducing pro-inflammatory mediators involved in the modulation of pain.2
My Experience at a Cryotherapy Center
I am fortunate to live in a city where cryotherapy is offered. Last week, I visited one called U.S. Cryotherapy to find out for myself what this new pain relief trend is all about. It’s a franchised business with locations in ten states including here in California, Arizona, Texas, and Florida. Upon meeting the owner, I discovered that you do not need to have a professional license (M.D., R.N.) in order to own or operate a center. Apparently, the corporate attorneys made sure that the services offered do not violate any laws regulating the practice of medicine in the state. This also suggests that the services are relatively safe to do without direct supervision of a doctor or nurse, which is reassuring.
I filled out a general medical history form on a wall tablet (touch screen). This lets the technicians know if you have any condition that might make cryotherapy risky, such as heart problems. After that, I got a tour of the facility and was shown the main cryotherapy services: whole body cryotherapy (WBC) and localized treatment cryotherapy. I decided to try WBC first. They have you remove your clothes and provide shorts (yes, you go in a freezing room bare skinned!). You put on a terry cloth head band that goes over the ears to protect them from the cold, a towel face mask to cover your nose and mouth, a pair of large wool mittens to protect your hands, and wool loafers. At this point, I am wondering what I have gotten myself into, as I have never experienced being in sub-zero temperature in bare skin!
Whole body cryotherapy chamber, -150 degrees F.
The WBC room resembles a meat locker,with a warmer holding room that you stand in prior to entering and a reefer-style heavy stainless steel door. The technician stands at the control console outside the room, which hasa large window so that you can be monitored constantly. H e sets the time and temperature, and when the temperature reaches 100 degrees below zero Celsius, he then gives the sign to enter.
I enter, and at first it doesn’t feel as cold as I thought—a crisp, dry cold enveloping my whole body. Later, I found out why. According to their website:
“Cold air therapy in the whole body chamber is a dry fresh, oxygenated air so you won’t experience shivering, goosebumps or other reactions that you might associate with being cold. Because of this technology, unlike an ice bath or immersion, cryotherapy is not painful. During the treatment, your skin temperature will decrease between 30-45 degrees over 2.5 to 3.5 minutes inside the chamber.”
Now this is interesting. With dry air (much of the water vapor removed) you can handle lower temperatures than if you were to soak in an ice bath. You see, heat travels faster through a liquid than it does through gas (air—CO2, O2, N, and H) which is why most people can’t handle more than a few seconds of being submerged in a bathtub full of ice water. The dry, sub-zero temperature air of WBC enables you to stay exposed for 2-3 minutes enabling more therapeutic effect.
At the one minute mark, I was getting really cold, and started to walk around and move my arms to generate some heat. But even then, it was a different kind of cold I haven’t experienced before. I wasn’t shivering. My teeth weren’t rattling, and I did not get goosebumps. It was just a sensation of homogeneous, intense cold. I noticed some small ice crystals forming on my arm, because as heat leaves the surface of the body it interacts with the air causing any remaining water vapor in the air to crystallize into frost. Was I going to make it?
At the two minute mark, I noticed my heart was beating faster. This is a sympathetic nervous system response to extreme cold and is a desired response as it stimulates the release of endorphins and norepinephrine by the brain. Endorphins are the “feel good” hormone that reduce pain and stress, and creates the sense of euphoria. Norephinephrine, also called noradrenaline, is a neurotransmitter released during times of stress that boosts focus, attention and mood. Scientists also found out that it suppresses the production of tumor necrosis factor (TNF), one of several inflammation-promoting biochemicals. This sequence of events occurs in response to what is called “cold shock,” and is the therapeutic goal of WBC. Cold shock is caused by a hypothermic event (a big, sudden temperature drop at skin, such as that caused by WBC) causing heat to leave the body much faster than usual, which vasoconstricts (tightens) the blood vessels of the extremities (another sympathetic nervous system response) and diverts blood from the arms and legs to the core to keep the vital organs warm.
As the effects of cold shock continue, any musculoskeletal pain present (strain, acute or chronic injury, or arthritis) is lessened. Blood vessels constrict, blood flow slows down, inflammation drops, and pain signals traveling from pain site to brain slow down significantly because action potentials (electrochemical charges) move slower in colder environments.
At 2:15 into the treatment, I sensed my cold tolerance quickly being reached and was ready to get out the chamber ASAP (but, this could partly be due to apprehension as it was my first experience). I reached 2:30, and eagerly exited the chamber. The technician used a laser thermometer on my skin and reported that my skin temperature dropped about 50 degrees.
Upon exiting the waiting room of the WBC chamber, I felt invigorated. Although I am in pretty good shape musculoskeletal-wise, I have minor aches in my feet and shoulders, mostly due to my age and years spent as a chiropractor. But after the cryotherapy session, these aches were significantly reduced, almost down to zero.
When you exit the chamber and return to room temperature, the heat from the warmer air moves into your colder skin, which is sensed by your central nervous system. This shuts off the cold shock response, and the body returns to homeostasis: the constricted blood vessels dilate back to normal and oxygen-rich blood moves into the extremities again. So if you have, let’s say, knee swelling and inflammation, the constriction and then dilation of blood vessels effectively “wrings out” inflammation and then draws in oxygenated blood and nutrients to the knee, much like squeezing out dirty water from a sponge and then releasing it, letting it soak up clean water.
Cold shock followed by room temperature helps to move stagnant blood and inflammatory chemicals out of an injury site, and bring in fresh, oxygenated blood, similar to wringing out dirty water from a sponge.
Here is a short video provided by U.S. Cryotherapy that explains how cryotherapy works:
Is a Simple Ice Pack Just as Good as Whole Body Cryotherapy?
WBC produces a much different effect than using localized ice, which also reduces pain by localized vasoconstriction and slowing down pain signals. The big difference between the two is that ice application does not initiate the systemic (body-wide) cold shock response like WBC does, so you don’t get the additional anti-inflammatory benefits previously described, or the endorphin and norepinephrine release. Local cryotherapy application is also superior to an ice pack because it is able to apply lower temperature to your skin. Most physical therapists will tell you to ice for 20 minutes max, but that is not possible with localized cryotherapy because of the much lower temperature it provides. Two to three minutes is the longest time human skin can take with cryotherapy.
How Often Should You Get Cryotherapy?
Whole body cryotherapy treatment guidelines for pain reduction depend on the goal. If you are post-surgery or have an acute (recent) injury, daily to multiple per day exposures for a week are appropriate. If you have chronic joint pain, a wellness routine is more appropriate, which can be once to twice a week treatments. Lastly, you can do it for general wellness on an as-needed basis. You’ll get a jolt to your circulatory system; increased heart rate (strengthens heart muscle like exercise), endorphin release, and according to the folks at U.S. Cryotherapy, improved sleep and mood.
Now with WBC under my belt, I decided to try localized cryotherapy on my chronic elbow strain and hand. For this procedure, I sat in a recliner while the technician used a machine to blow cold, dry air around my elbow. While he did this, he used a laser thermometer to monitor skin temperature. He directed the cold stream of air back and forth in quick, short strokes over the painful areas. The air is so cold that you cannot leave it in one spot for more than a few seconds; otherwise you can get tissue damage. Overall it felt as intense as the chamber, except localized. After the 3 minute treatment, the pain was reduced about 70%.
Localized cryotherapy treatment
After You Do Cryotherapy
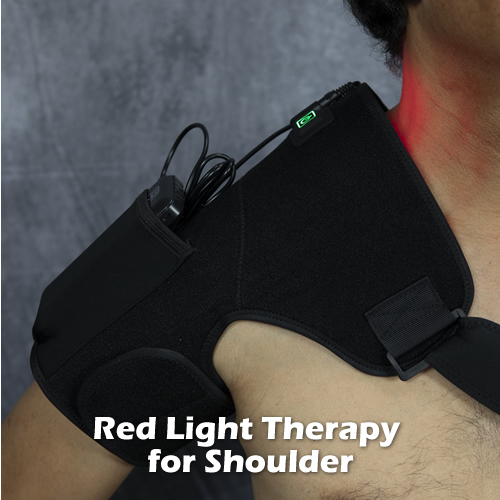
After your cryotherapy session, you can engage in 20 minutes of exercise on a treadmill or stationary bike. This enhances circulation and flushes out of waste products. They also have a red light therapy chamber you can use immediately after doing WBC, as well as Pulsed EMF (uses pulsed magnetic waves) which can further reduce pain and even accelerate healing of tissues. I previously wrote about the benefits of both of these modalities as I have used them myself, with success. They make excellent home therapy devices.
What Health Experts Say About Cryotherapy
You may have heard of Wim Hoff, known as the “Iceman.” He is a Dutch athlete famous for being able to withstand extremely cold temperatures. He does this regularly because he believes exposure to cold is good for your health. According to Hoff:
“Proper exposure to the cold starts a cascade of health benefits, including the buildup of brown adipose tissue and resultant fat loss, reduced inflammation that facilitates a fortified immune system, balanced hormone levels, improved sleep quality, and the production of endorphins— the feel-good chemicals in the brain that naturally elevate your mood.”
Wim Hoff opines that modern living, where man is always wearing layers of clothes and living in temperature controlled environments dulls the body’s innate responsiveness and adaptability to its natural environment, which makes modern man more susceptible/ less resistant to disease. You don’t need to emulate Wim Hoff (the physical feats he does in cold would kill most people), but realize there are health benefits to exposing your body to cold.
Mark Sisson, a popular health blogger noted for his “primal” philosophy of mimicking prehistoric man’s lifestyle to strengthen your health (which I follow loosely), states that occasional, intentional exposure to cold will “improve your focus, confidence, and mental resilience…and that these benefits will carry over into all other areas of life.” He adds, “Anecdotal evidence from [extreme cold] enthusiasts also suggests that toughing out a cold shower or committing to a focused cold therapy regimen has profound mood elevating effects.” Those who endure the unpleasantness of being subject to extreme cold do so because they know that feeling good is just around the corner.
According to Dr. Rhonda Patrick, PhD., an expert in longevity science, just a 20-second immersion into freezing water a couple times a week can increase norepinephrine levels 200-300 percent. Imagine what 2-3 minutes would do. This will increase your heart rate, constrict blood vessels, and release glucose into the blood for your skeletal muscles. As previously mentioned, norepinephrine also acts as an anti-inflammatory by reducing tumor necrosis factor, a substance associated with practically all inflammatory-related diseases.
When you do whole body cryotherapy or other extreme cold practice, it basically conditions your body’s innate, adaptive mechanisms. Your body’s ability to handle large temperature swings is actually a health metric, like cardiovascular fitness and mobility. We tend to lose this as we age, which is why the elderly are more vulnerable to heat waves and are usually the first casualties when one strikes. Exposing yourself to very cold temperatures for short periods to increase your tolerance to cold is intuitively a good, health-promoting activity.
One thing that I should point out about cryotherapy is that it is not recommended post exercise. When you do an intense workout such as a marathon, the post-workout inflammation in the muscles should be allowed to run its course. This builds muscle adaptation to exercise by conditioning its restorative/recuperative mechanisms. Doing cryotherapy immediately after exercise, while it feels soothing, interrupts the process. It inhibits the “adaptation conditioning” of your muscles and you will not increase your endurance.
The Final Verdict
If you have any form of musculoskeletal pain and are fortunate to have a cryotherapy center nearby, give it a try. It’s one of those things that, while not a magic bullet for pain, has enough anecdotal evidence to validate its claim, as well as science. 100 degrees below zero Celsius while in your shorts can understandably intimidate some people, but it’s not that bad—you are in there for less than three minutes, and it’s dry cold, which your body is able to tolerate better. Whole body cryotherapy’s value is its ability to “comfortably” produce cold shock, reducing inflammation and pain and stimulating endorphin and norepinephrine release which improves mood, mental clarity and sleep. Do not use it post-exercise; rather, consider using it a couple of days after orthopedic surgery; after any recent soft tissue trauma (sprain/strain, whiplash from car accident, sports injury); if you have a chronic musculoskeletal conditionsuch as knee osteoarthritis or shoulder problem; or, for general wellness.
If you don’t have a cryotherapy center in your town, there’s another way to get the benefits of extreme cold therapy: get a freezer chest and fill it with water and ice so that the temperature is near freezing. Then, you’ll need to brave the initial shock of submerging yourself, and see how long you can tolerate it. Since it’s cold water and not cold air that you are using, it won’t be as comfortable as using a cryotherapy chamber; you will likely shiver due to the faster heat transfer properties of water vs. air. Here is a video of Brad Kearns, co-author (with Mark Sisson) of the Keto Reset Diet and cold therapy enthusiast, on how to set up your personal cold therapy center:
Lastly, if this isn’t an option for you, try turning your shower water to cold for a minute or two. It’s best to just go for it and not try to ease yourself into it—turn that knob and tough it out. Do it in the middle of your shower and finish with a couple of minutes of warm water, or finish your shower with two minutes of cold water. You will feel invigorated; trust me. Do it every time you take a shower, or every other time– the more you do it, the better you’ll adapt. Keep in mind all the health benefits of cold exposure you’ve learned here; hopefully this will motivate you to take some action.
1 Sang-Yeol Ma et. al, Archives of Physical Medicine and Rehabilitation. Volume 94, Issue 1, January 2013, Pages 9-16.
2 Lorenzo Bettoni et. al, Clinical Rheumatology. September 2013, Volume 32, Issue 9, pp 1337–1345.
If you’ve ever had a kink in your neck, or felt your upper or lower back needed some “cracking” because you sensed restricted movement, then you are probably familiar with the benefits of spinal adjustments; also called manipulation.
So what exactly is a spinal adjustment?
Basically, it is a hand-delivered force into an improperly moving joint done to make it move normally. Vertebrae can get “stuck” in a rotated or bent position by numerous ways, such as sleeping on your stomach with neck twisted or a sports injury. This can feel very uncomfortable and may even cause sharp pain, arm numbness or headaches.
It is roughly estimated that about one million adjustments are done in the U.S. every business day, mostly by chiropractors. It is their “bread and butter” treatment because chiropractic is based on the belief that abnormal spinal alignment contributes to poor health, and manually correcting the alignment can improve health. Because they do it the most, chiropractors are considered the specialists most proficient at spinal adjustments/ manipulation.
According to ShareCare, about 30 million people see a chiropractor each year, mostly for various types of musculoskeletal pain and dysfunction. The benefit is improved range of motion (flexibility) and decreased discomfort/pain. Some patients experience other symptomatic improvement such as cessation of a headache or clearance of congested sinuses (there are medical models to explain this, but this isn’t the focus for this particular article). While there are pockets of naysayers, it is fair to say that getting your neck and back adjusted can be good for you.
Are You Actually “Adjusting” Yourself When You Crack Your Neck Yourself?
If you or someone you know “crack” your joints by twisting your neck or low back until you hear a pop. I personally know someone who has a daily routine for this, using her hands to forcibly twist her neck by grabbing the top of her head and chin like in the picture above, and rotating her head far to the left, then right; and then twisting her spine while sitting. I noticed that she gets an unusual amount of popping when she does this; seemingly with little effort. This excessive popping indicates that the spinal facet joints have become hypermobile from overstretching—they’ve lost some of the ligamentous support, allowing the joint to move more than it was designed to. Hypermobility of joints accelerates wear and tear, leading to bone spurring and disc thinning, which can eventually press on nerves inside the spine causing pain and weakness in the extremities. Although, as far as I know, there are no conclusive studies on the benefits or harm of cracking your neck often, I believe that it is best not to do it for these reasons.
The next question is, if you are able to pop your own neck or low back by forcibly twisting it, are you essentially adjusting it? Are you getting the same benefit as an actual chiropractic adjustment?
This is not easy to answer, because in order to get a scientific-based answer to this, a large study (many people) is necessary, which hasn’t been done to my knowledge. Also, the outcome (result of cracking vs. adjusting) is difficult to measure. As a chiropractor myself, here is my explanation of the difference between “cracking” your own neck and getting a chiropractic adjustment:
When you “crack” your neck yourself, you are essentially twisting or bending (depending how you do it) all your neck vertebrae at the same time. At some point, you get cavitation—the popping sound made by collapsing pockets of dissolved gases in the small facet joints of the cervical vertebrae, due to the expansion of those joints as you bend your neck to the side. There is a sense of pressure release and improved neck flexibility afterwards. Sometimes it can be verified by checking range of motion before and after; sometimes not. People who do it will typically say “it feels good,” or “it relieves pressure.”
On the other hand, a chiropractic adjustment to the neck targets just one vertebrae—the problematic one identified by palpation and/or x-ray, so it is more precise. It also incorporates an external force—the hand thrust—that forces the vertebrae into the direction where it is deficient; i.e forces it back to its normal range of motion.
Most people will tell you that the feeling after a neck adjustment is very different that the one you get by merely twisting your neck: it is a focused, louder sound and you feel a heightened sense of things immediately afterwards, similar to having a wax earplug removed or clogged nasal sinuses suddenly cleared. This may be explained by improved nerve firing, better circulation and restored neck muscle balance.
So these are the differences between cracking your own neck and having a chiropractor adjust your neck. But again, there are no studies I can reference that proves the superiority of one over the other. Currently, the evidence is subjective, or anecdotal.
Is It Easy to Do Adjustments Yourself?
If you have ever been to a chiropractor, you know that it does not take long for the chiropractor to do an adjustment – about 5 seconds total, including the palpation (feeling for the joint’s movement) and set-up of the thrust. On the surface, an adjustment seems like a relatively simple procedure to do (although more subtleties are involved that you don’t notice). In other words, it’s not brain surgery. This apparent simplicity is what encourages some people to try it on themselves or their housemate, partner or friend. They take note of what their chiropractor does and perhaps watch YouTube videos of chiropractors adjusting patients to see how it’s done. I even made a video on chiropractic adjusting a couple of years ago which you can see here. I will venture to guess that a lot of “adjusting” occurs outside of chiropractic and physical therapy offices.
So, is self-adjusting, or adjusting a housemate safe? Can it be beneficial? Most would say no, for the obvious reasons—you need to get proper training, it could be dangerous and you could hurt someone, etc.
There can also be legal implications to this, such as practicing without a license.
Obviously, the best solution is to seek the services of a licensed, experienced chiropractor who knows the ins and outs of adjusting. However, I do understand that some people cannot afford to see a chiropractor, or don’t have access to one; or simply don’t want to see one for personal reasons but still desire to obtain the benefits of spinal adjustments. As a big believer and advocate of self-care for managing musculoskeletal pain, I have an atypical perspective on this, which I’m sure most chiropractors won’t agree with. My view is that, with proper guidance, every day people can learn to do modified adjustments, or joint mobilizations to relieve pain and discomfort on themselves and others. These are basically targeted stretches that have elements of joint mobilization. Before I describe them, I will explain the distinctions between adjustments, joint mobilization and stretches.
An adjustment is a short lever, high velocity manual thrust into a joint. Short lever means that you contact a small protuberance of a bone and use it as a lever to move the whole bone (see diagram below). If it’s a spinal vertebra, you can use the bone’s transverse processes or spinal process as a lever to move the whole vertebra. You locate these structures, contact them with your hands, decide which direction you wish to move the bone, and thrust in the appropriate angle and depth.
The term joint mobilization is used to describe longer lever, lower velocity force applied to a joint; for instance, using the femur bone for leverage to manually circumduct the hip joint.
Stretches of course apply to the soft tissues—muscles, ligaments and tendons. They are done to elongate contracted fibers to increase flexibility, and are done by isolating the muscle and elongating it with movement. Stretching ligaments requires you to move the joint to its end range of motion, and then a few degrees past it.
Together, adjustments, joint mobilization and stretches are the three, primary tools of manual therapy for the musculoskeletal system. Note, however, that soft tissue mobilization is a term used to describe various forms of deep tissue/sports massage, and can also be considered manual therapy.
In my opinion, it is fine for someone to learn how to do modified forms of adjustments. Manual therapy is one of the safest forms of therapeutic intervention; even safer than taking aspirin. So if you’re an athletic trainer, massage therapist, acupuncturist or anyone else who is interested in learning how to adjust yourself or someone else, know that there are options. I believe the time has come for people to learn how to do basic manual therapy for the benefit of others. The trend may lead to a dramatic decline in neck and back pain in the population, much like how the fitness craze starting in the 80’s made people more lean and fit.
In the coming days, I will explain how to do some basic adjustments and joint mobilization moves that you can try—on yourself, and others. The key to doing these is to do them slowly and stay focused on what you are doing. Avoid sudden jerks especially to the neck. It’s not an issue when people stretch themselves and help stretch others. The techniques that I believe are safe and appropriate for non-trained people to do are similar in scope and complexity, but with some focus on moving the joints. Stay tuned!
If you are on Facebook, you’ve probably seen the relentless advertisments for massage “guns.” These are heavy duty, hand-held vibrational massagers that sellers claim provide a number of benefits; namely increasing blood circulation to muscles, reducing muscle tightness, reducing pain and improving muscle recovery from sports activities. The ads suddenly exploded on the scene a couple of months ago. There appear to be multiple sellers selling the same device, with brand names including Halo Pro, G3, Hypervolt, XVan and Intellitop and most if not all are manufactured in China. The price ranges from about $100 – $225.
Below is a screenshot of the Amazon listings of these products. Apparently, they are selling like pancakes:
But are massage guns really good for you? Are they worth the money you spend? Or, are they just old technology being packaged as something new and innovative, using exaggerated claims and expensive marketing? Or perhaps…can massage guns be harmful to you?
Well, let’s break it down, piece by piece. First of all, there isn’t much medical technology involved in these massage guns. At the heart of these massage guns is a variable speed motor and armatures that together produce rapid oscillation of a rod, to which you can attach various treatment heads. That’s it. It’s essentially the same engineering as a jigsaw/ reciprocating saw, with a shorter depth of movement.
Typical massage gun sold on Amazon
You apply it to a large muscle, such as the quadriceps (thigh muscles), gastrocnemius (calves), erector spinae (back muscles), or if you are a bulky weight lifter, the biceps and triceps muscles. If you want to use it on the smaller posterior neck muscles, there is a horseshoe shaped attachment available.
Using a massage gun on the quadriceps
Mind you, the force generated by these massage guns is significant: people with smaller and/or more sensitive muscles will not be able to handle it, and may even get bruised. These massage guns, in my opinion, are better suited for those who have a larger muscle mass than most people; muscle that is well-conditioned from training; i.e hypertrophied muscle.
Are There Health Benefits to Deep Vibration?
The sellers of these hand-held massage guns instruct the user to place the treatment head over the belly of the muscle (thickest part; usually in the middle), applying a downward force as shown in the picture above. You can keep it stationary or slide it up and down the muscle, applying light to heavy pressure.
In order to get an idea of what happens to the muscle when you use a massage gun on it, it helps to understand the anatomy and physiology of muscle and surrounding tissue.
Starting from the top, your skin: is your skin firm or saggy? This depends on the quality and density of collagen and elastin fibers that form your dermis, or lower layer of skin. Younger people have firmer, resilient skin, thanks to dense and higher quality (less degraded from age) collagen fibers. People 50 and over, not so much. So if you are in your 30s, that’s a plus for you if you want to use a massage gun. Your skin is likely tougher and able to handle the force of those vibrations.
Anatomy of skin
Small blood vessels and nerve endings are present just below the dermis, or hypodermis. When these vessels dilate, you get hyperemia, or reddening of the skin.
Next in line, your subcutaneous fat. This is the fat directly underneath your skin, laying just above your muscle whose function is to provide a protective cushion for the body. Its thickness varies, depending on the location in your body; your age, sex (females tend to have more subcutaneous fat as a percentage of body mass), and health status. If the subcutaneous fat over your muscle is a good inch or more thick, this provides a barrier to the vibration and absorbs and dissipates some of that force. So, thicker subcutaneous fat is another plus for massage gun use.
Subcutaneous fat lies underneath skin
And third, the target of the massage gun– skeletal muscle. Muscle is denser and heavier than fat as it is comprised mostly of protein; specifically actin and myosin, the specialized fibrous protein that comprise the contractile units. Muscle is covered by fascia, a tough fibrous webbing that lends support to the muscle as it contracts.
Skeletal muscle covered in fascia (electron microscope)
Blood vessels penetrate the muscles, supplying them oxygen and nutrients and transporting waste products away. Below is an illustration of the vessels that service the upper leg muscles. It shows the large caliber vessels– the femoral artery and veins, and the smaller branches that attach to multiple areas of each muscle.
Lastly, be aware that there are nerves in the area. The femoral and sciatic nerves pass through the leg muscles, and smaller divisions branch off and attach to multiple areas of each muscle to provide direct stimulation from the brain.
Thigh muscles showing location of major arteries, veins and nerves
So, when you place the massage gun over the skin and press into the muscle, it pulsates rapidly and with each stroke the skin, fat, muscle, blood vessels and nerves get compressed and then rebound hundreds or thousands of times, depending on how long you apply the massager
Here are the physiological effects of the massage gun:
Blood in the vessels of the skin are repetitively blanched and dilated, reddening the surface of the skin. In some cases, capillaries may burst, and if enough of them burst you will get visible bruising (small volume blood leakage into the tissues).
Special sensory nerve endings in the skin fire. These nerve endings detect vibration, pressure, and light touch. Any neural input is sent to the brain for processing, and complex interactions with other nerve pathways may occur causing distal/secondary effects such as change in heart rate and blood pressure.
The collagen in your skin gets stretched/worked. This could loosen the skin over time.
The subcutaneous fat gets compressed. Fat is enclosed in tough, fibrous tissue so there is no effect on fat mobilization.
The muscle absorbs the force. While muscle cells are very durable, it is possible that some of the actin and myosin proteins could be damaged especially those with smaller and/or less conditioned muscles; or older people. This could affect muscle contraction and strength.
The nerves that cause muscles to contract by depolarizing the muscle membrane fire repeatedly, causing small muscle contractions and some fatigue (try curling a weight after using a massage gun on your biceps, and see if you have full strength). If you have an abnormally contracted muscle, this may help it regain normal tone by hyperpolarizing the nerves that stimulate it, causing them to deplete their neurotransmitter temporarily.
If there is scar tissue around your muscle or fascia, the repetitive force of the massage gun may help loosen it by stretching the shortened fibers. This could help regain some lost range of motion and improve flexibility of the muscle.
The deeper blood vessels in the legs may absorb some of the force, if you angle it just right. This could be a dangerous, especially for those who have blood coagulation problems. It could loosen a thrombus (blood clot resting in a vessel) causing it to detach. This could cause a stroke or pulmonary embolism, two potentially fatal conditions. So be careful if you use the gun on your legs, especially your calves.
So what’s the final verdict? Are massage guns worth it? Will they work as advertised?
As in many cases like this, it depends. My advice is that it wouldn’t hurt to get one if you know that this kind of massage makes you feel better– relaxed, invigorated, less muscle pain, or other perceptible benefit.
Secondly, don’t think these massage guns are a magical, new technology. They simply are another form of vibrating massage devices, which have been around for decades. However, they do have one good selling point, and that is ergonomics. They are much easier to handle, and lighter, than the old generation of vibrational massagers like the one below. This means you have better control on applying the massage.
Older generation portable, vibrational massager
These massage guns are also convenient for travel, as they take up a relatively small space in your luggage. For those who travel frequently, it could be a good way to reinvigorate your leg and feet muscles.
I can see the massage guns being a better choice for massaging a trigger point, or patch of scar tissue. The interchangeable heads allow you to focus the pressure over a smaller area, too.
And finally, don’t overdo it. Longer time does not always translate to better for you. Due to the massage gun’s power, I’d say two minutes maximum for any large muscle like the quadriceps group; and one minute max if you are massaging your neck muscles. Get the blood circulation going, and stimulate the muscle just enough to get it to loosen, and no more. If you take blood thinners to reduce blood clotting, I would avoid using it on your legs. Instead, opt for a Swedish style massage from an actual massage therapist. And warning, some people get nauseous from strong, high frequency vibration, and it’s worse the closer you are to your head (inner ear/ vestibular apparatus). The vibration generated by a typical massage gun is strong enough to move the fluid in your inner ear, which may cause nausea and vomiting in some people, so be careful.
Here is one of the better selling massage guns on Amazon. It seems good quality, and has many positive 4 and 5-star reviews, with over 3,500 reviews as of this writing.
A massage gun can be a good addition to your arsenal of home therapy tools. Make sure to visit our homepage, where you can find free self-care videos on the 15 most common presentations of musculoskeletal pain. You will discover the tools and equipment that I personally recommend for pain management at home. There are not many, because not all products are worth your time. As a chiropractor, I’ve tested nearly a 100 therapeutic products on my patients over 20 years, and based on their feedback and treatment results, these are the products I recommend. Opt in to my “Pain Relief Tips” newsletter to get great ideas o how to minimize pain and increase strength and flexibility in your body.
Receive a FREE, 30-Day Plan to Boost Your Health and Eliminate Pain!
As a subscriber, you'll also learn the special methods used by experts in human biomechanics to fix body aches and pain the RIGHT way, long term.
We'll also send you a Free eBook, Concepts of Self-Healing as a way of saying thanks.
Please check your email in 5 minutes to access your Special Report. Make sure to whitelist "[email protected]" in your email client (Gmail, Yahoo, Outlook, etc.) so that you don't miss this valuable information. One way is to add this email to your email Contacts.

 The jaw, or temporomandibular joint is classified as a synovial, condylar joint. Joints are named after the two bones that comprise it, so the TMJ is formed by the articulation of the mandibular fossa (depression/pit) of the left and right temporal bones of the skull and the left and right condylar heads of the mandible (lower jaw), hence temporomandibular joint. It could have been named the “mandibulotemporal joint,” or MTJ, but someone long ago decided temporomandibular sounded better.