Understanding Impingement Syndrome in the Shoulder: Causes and Rehabilitation

Understanding Impingement Syndrome in the Shoulder: Causes and Rehabilitation

The shoulder is a marvel of human anatomy, offering an impressive range of motion. However, this mobility comes at a cost, as the shoulder joint is highly susceptible to various conditions and injuries, one of the most common being impingement syndrome. In this  article, I will discuss the causes, symptoms, diagnosis, and treatment options for shoulder impingement syndrome, with a primary focus on rehabilitation techniques to help individuals recover and regain full shoulder functionality.

Introduction to Shoulder Impingement Syndrome

Shoulder impingement syndrome is a painful and often debilitating condition that occurs when the tendons of the rotator cuff and the subacromial bursa become pinched or impinged between the bones of the shoulder, primarily the acromion (a part of the scapula or shoulder blade) and the humerus (the upper arm bone). This impingement leads to inflammation, pain, and restricted shoulder movement.

Anatomy of the Shoulder

Before delving into the causes and rehabilitation of shoulder impingement syndrome, it’s crucial to understand the intricate anatomy of the shoulder joint. The shoulder comprises three bones: the humerus, the clavicle (collarbone), and the scapula (shoulder blade). The glenohumeral joint, where the head of the humerus articulates with the shallow socket of the scapula, allows for the remarkable range of motion in the shoulder.

Rotator Cuff and Subacromial Bursa – The rotator cuff is a group of four tendons and muscles that stabilize the shoulder joint and facilitate its movement. These four muscles include the supraspinatus, infraspinatus, teres minor, and subscapularis. They work in unison to control arm movements and maintain joint integrity. The subacromial bursa is a fluid-filled sac that reduces friction between the rotator cuff tendons and the acromion, promoting smooth shoulder motion.

Causes of Shoulder Impingement Syndrome

Understanding the underlying causes of shoulder impingement syndrome is crucial for effective rehabilitation. Several factors contribute to the development of this condition.

Anatomical Factors

Shape of the Acromion

The shape of the acromion can vary from person to person. Some individuals have a flat or curved acromion, while others have a hooked or pointed acromion. A hooked acromion is more likely to impinge on the underlying tendons, increasing the risk of impingement syndrome.

Bone Spurs

Over time, the formation of bone spurs (osteophytes) on the acromion or the clavicle can reduce the space within the subacromial space, making impingement more likely.

Overuse and Repetitive Movements

Overhead Activities

Engaging in repetitive overhead activities, such as painting, swimming, or throwing, can lead to overuse of the shoulder joint. This overuse can irritate and inflame the rotator cuff tendons, increasing the risk of impingement.

Poor Posture

Poor posture, especially slouching or forward-leaning positions, can alter the biomechanics of the shoulder joint, narrowing the subacromial space and leading to impingement over time.

Muscle Imbalances

Muscle imbalances in the shoulder girdle can also contribute to impingement syndrome. Weakness or tightness in certain muscles can alter the mechanics of the shoulder joint, leading to impingement.

Trauma and Injuries

Shoulder injuries, such as falls or accidents, can damage the structures within the shoulder joint, leading to inflammation and impingement syndrome. Additionally, dislocated shoulders or fractures can alter the joint’s anatomy, increasing the risk of impingement.

Signs and Symptoms of Shoulder Impingement Syndrome

Recognizing the signs and symptoms of shoulder impingement syndrome is essential for early diagnosis and prompt treatment. Common symptoms include:

Pain

Pain is the hallmark symptom of shoulder impingement syndrome. The pain is typically located at the front or side of the shoulder and may radiate down the arm. It is often aggravated by overhead movements or reaching behind the back.

Weakness

Individuals with impingement syndrome often experience weakness in the affected shoulder. This weakness can affect the ability to lift objects or perform daily activities.

Limited Range of Motion

Impingement syndrome can restrict shoulder mobility. Individuals may find it challenging to raise their arms overhead or reach behind their back.

Night Pain

Many people with shoulder impingement syndrome report pain at night, particularly when lying on the affected shoulder. This can disrupt sleep and lead to chronic fatigue.

Clicking or Popping

Some individuals may hear clicking or popping sounds when moving their shoulder. These noises can indicate underlying structural issues.

Diagnosis of Shoulder Impingement Syndrome

Diagnosing shoulder impingement syndrome involves a combination of clinical evaluation, patient history, and imaging studies. Healthcare providers typically follow these steps:

Medical History

The doctor will ask about the patient’s symptoms, including when the pain started, its location and severity, and any exacerbating factors like specific movements or activities.  Oftentimes, impingement syndrome can gradually appear with no obvious cause, but if you look at the long term history of the patient’s work and/or recreational activities, aggressive shoulder movements are typically included (repetitive lifting above the shoulder; contact sports, tennis, baseball pitcher, etc.).

Physical Examination

During a physical examination, the healthcare provider will assess the range of motion in the affected shoulder, strength, and any signs of inflammation or tenderness.  The cardinal sign is pain with shoulder abduction (raising the arm from the side causes a deep, sharp pain inside the shoulder joint; patient has difficulty raising his/her arm above shoulder level due to mechanical restriction and acute pain.

calcific tendonitisImaging Studies

Imaging studies, such as X-rays, ultrasound, or MRI, may be ordered to visualize the structures within the shoulder joint. X-rays can reveal bone abnormalities, while ultrasound and MRI can provide detailed images of soft tissues like tendons and the subacromial bursa.  However, this is usually only done if rest, physical therapy, and home care do not produce desired results after a week.

Cortisone injection

In some cases, an injection of a local anesthetic into the subacromial space may be performed. If the pain is alleviated shortly after the injection, it can confirm the diagnosis of impingement syndrome.  This is because with impingement syndrome, there is swelling and inflammation, and cortisone is a quick-acting anti-inflammatory medication.  So, if the pain is alleviated following a cortisone shot, it confirms there is localized swelling, which is likely coming from either the bursae or a tendon.

Non-Surgical Rehabilitation for Shoulder Impingement Syndrome

The treatment of shoulder impingement syndrome typically begins with non-surgical interventions, such as physical therapy and lifestyle modifications. The goals of rehabilitation are to alleviate pain, improve shoulder function, and prevent recurrence.

Rest and Activity Modification

Resting the affected shoulder and avoiding activities that worsen symptoms are essential in the early stages of rehabilitation. This may include temporarily ceasing activities that involve repetitive overhead motions.

Physical Therapy

Physical therapy is a cornerstone of non-surgical treatment for shoulder impingement syndrome. A qualified physical therapist will design a personalized exercise program to address muscle imbalances, improve strength, and enhance shoulder mobility. Common physical therapy techniques include:

Stretching Exercises

Stretching exercises target tight muscles in the shoulder girdle and surrounding areas. This can help improve flexibility and reduce tension that contributes to impingement (see video below).
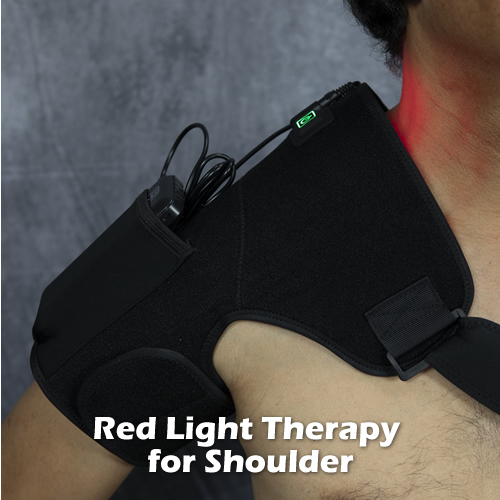
Modalities

You can use a red light therapy wrap to reduce pain and swelling of your impingement syndrome.  Red light therapy wraps use light in the therapeutic wavelengths of red and infrared to accelerate tissue healing and deep heat tissues to increase blood flow and oxygen.  See below for an example:

SUMMARY:

Shoulder impingement syndrome occurs when a swollen tendon and/or bursa inside the glenohumeral joint, where your humerus articulates with your scapula, impedes movement of the joint by rubbing against hard structures, particularly the acromion.  The goal is to shrink the swollen tendon so that proper movement is restored, and then correct any biomechanical deficiencies in the shoulder complex, such as weak or tight muscles, and subluxated joints affecting the shoulder movements,  using exercise rehabilitation, joint mobilization and red light therapy.

The Critical Exercise Most Everyone is Not Doing

The idea that exercise benefits your health is a medically and scientifically proven, and perhaps more importantly, socially accepted concept.  We can now call it a fact.  Research conclusively shows that regular physical activity promotes multiple improved health metrics such as lowered LDL and increased HDL cholesterol levels; decreased triglyceride levels; healthy blood pressure, brain health, improved bone density, increased insulin sensitivity and more.  Exercise is also positively correlated with longevity.  We know exercise is important if we are to stay healthy, maintain a high quality of life, and live longer.

When it comes to exercising, there are basically three groups of people who engage in it:

 1. The elite, professional athletes whose livelihood depends on their physical abilities and talents. These people have the benefit of professional trainers and unlimited facilities and equipment to get their bodies in shape.  Not something the rest of us can say.

2. The fitness fanatics who hit the gym 3-7 times a week; sometimes more than once a day; keep abreast of the latest exercise techniques and have a better grasp on the science of fitness—basically those who make fitness a central part of their life.

3. The everyday Joes and Janes who take aerobics classes; jog, use a treadmill or Stairmaster and/ or lift weights, as best they know how.

Which group do you fit in?

There are two, textbook categories of exercise:  resistance and endurance.  In resistance exercise, you apply resistance to your muscles via traditional weights; other heavy objects (medicine balls, tires, sandbags); friction, rubber tubing, and even your own body weight (planks, squats, TRX).  In resistance exercise, the primary goal is to strengthen your muscles by stimulating your body to produce more actin and myosin myofibrils, the specialized protein structures that do the actual contraction.  The more myofibrils your muscle cells (muscle fibers) have, the bigger your muscle; the bigger your muscle, the greater its potential for generating power.

In endurance exercise, the goal is to improve a muscle’s ability to function for a longer duration before fatiguing.  These exercises are more commonly called aerobic or cardio exercises since a big part of improving muscular endurance is to strengthen the heart and lungs.  Distance running and wind sprint running; Stairmaster™, cycling and aerobics classes are examples of endurance exercises.

It’s not entirely clear what precisely happens when muscles increase endurance from these exercises, but we do know that placing a sustained, increased demand on the heart, which is the essence of cardio exercises strengthens the heart, a muscle itself, enabling it to pump a larger volume of blood with each contraction (called stroke volume) to skeletal muscles to meet their oxygen and glucose (fuel) demands.   Endurance exercises also increase the number of muscle cell mitochondria, the organelles where ATP, the “energy currency” of cells, is manufactured.  Generally, more mitochondria means more ATP production.  By the way, if you find yourself out of breath after engaging in a level of physical activity comparable to walking up one flight of stairs, you likely have poor cardiovascular fitness.

A third type of exercise that is gaining popularity is muscle coordination or functional exercises.  These exercises focus on doing movements that are commonly required in everyday life, with the goal of strengthening/ improving the synergy and coordination between the muscle groups that create that movement.  Examples include walking up a flight of stairs; lifting and carrying luggage; lifting something from the floor to a higher level; lifting and carrying something heavy on your shoulder; pulling and pushing something heavy; jumping; sitting down and getting up, crawling on the floor, and so on.  Movement patterns such as these involve several synergistic muscle groups such as leg, buttock and back muscle groups that contract in a precise sequence and amplitude determined by your brain.  A primary goal of functional exercises, therefore, is to improve the neurological component of muscle group contraction so that your body responds more efficiently to its environment. To get a sense of how functional exercises work, check out the website Functional Patterns. 

This brings us to the fourth exercise that most people forget.  Resistance exercises strengthen the muscles; cardio exercises improve muscles’ endurance; and functional exercises improve the coordination of muscle groups involved in common movements, so what is missing? The one exercise that people forget, and should incorporate into their workouts are joint exercises.

In joint exercises, the goal is to mobilize and strengthen all the components of the joints—joint articulations, tendons, capsules, ligaments and deep muscles.  This requires moving the joint through all its ranges of motion, with and without resistance.   The resistance used in joint exercises is not as strong (use lighter weights) as that used in resistance exercises done to increase muscle mass, because gaining muscle mass is not the goal of joint exercises.  Whenever connective tissue (ligaments, tendons, bone) and muscle are stressed, the body senses it and makes adaptations:  it increases their mass and produces more supportive collagen fibers.   This is called Davis’ Law, which describes how soft tissue remodels along the axis of force.  The benefit is healthier, sturdier joints that resist degeneration better, and improved strength/ power generation.

  Joints are a biomechanical wonder that are an essential component of your locomotor system—the parts of your body designed to generate movement.  They enable your skeleton and muscles to do work; i.e. generate power.  Recall from basic science the simple machines:  pulleys, inclines, and levers with fulcrums.  As a machine, your musculoskeletal system incorporates all three; especially levers and pulleys.

lever and fulcrum model of elbow

Let’s take your arm for instance.  Your upper arm bone, or humerus connects to your lower arm bones, the radius and ulna via a joint we all know as the elbow joint.   This is a lever and fulcrum system such as the one illustrated above, with the humerus being the effort arm of the lever and ulna/radius being the resistance arm; the elbow being the fulcrum, and the biceps and triceps muscles being the force generators (effort).  The elbow joint is a critical component of this simple machine, as it stabilizes the system while allowing movement.  Its main components are the cartilage-lined ends of the long bones; the musculotendinous attachments to the long bones; and a capsule made of dense, connective tissue.  When you do joint exercises, you target all these structures.

elbow joint and major ligaments and tendons

 There are several types of joints in the body, classified by their construction and movability.  The type we will focus on are the synovial joints, which is the type that enables the greatest arcs of movement compared to other joint types.   Examples of synovial joints are the facet joints of the spinal column; the shoulder, elbow, wrist, and finger joints; and the hip, knee, ankle and toe joints.

To exercise a joint, start by moving it in all directions possible (active motion).  If you find a joint is offering restriction in one direction, you can passively move it; i.e. relax the muscles of the joint and use your opposite hand to move it, or ask a partner to move it; gradually pushing into the restriction and breaking through the mechanical barrier (but make sure it is not contraindicated; check with a specialist first).  Areas of joint movement restriction are usually caused by scar tissue adhesions where scar tissue from previous injuries adheres to adjacent tendons, inhibiting movement in a particular direction.

After doing active and passive joint movement, apply resistance.  There are several options, which depend on the joint you are exercising.  For the shoulder joint–the joint in the body that has the most versatility– you can use dumbbells or Theraband™ tubing.  If you have pre-existing shoulder problems, it may be better to start off with Theraband tubing.  If you have no shoulder joint problems, then start out with 3 – 5 pound dumbbells.  You can do these exercises standing up, sitting down, or lying prone or supine (refer to diagram below).  Basically, you move the resistance doing shoulder forward flexion, extension, abduction, adduction, and internal and external rotation (see diagram below).  Occasionally hold the position at ¼, ½, ¾ and end range for a few seconds, then return to full movement.

basic shoulder joint strengthening exercises

Next, transcribe circles with your arm, starting with small ones and increasing in circumference; then reverse directions.  I will post a video of these exercises later, so stay tuned.

For the hip joint, do active mobilization by doing a hula hoop motion with your pelvis while standing.  This rotates your pelvis over your femur heads in the acetabulum (socket), which moves the hip, a ball-and-socket synovial joint, in all directions.  Next, use Therabands™ or ankle weights for the resistance and move your hip joint in flexion, extension, abduction and adduction; hold for a few seconds in each position, then transcribe varying sized circles with your leg.  This can be done standing up or lying on your side.  This action stresses the hip joint components, thickening and strengthening them.

Similar approaches can be done for the elbow, wrist, finger, knee, ankle and toe joints.

Sometimes a joint “dries up” after years of insufficient movement.  This is common in office workers whose job description centers on typing/data entry.  In this position, the shoulder joint is relatively static (upper arm angle doesn’t change) and synovial fluid doesn’t adequately circulate around the joint surfaces. Synovial fluid is the equivalent of motor oil for joints, allowing them to move nearly friction-free.  When you don’t move your joints enough, synovial fluid levels drop and some friction sets in.  This causes your joints to feel achy and stiff.  Sometimes you may even hear grinding sounds with shoulder movement when levels are low.  Lubricin is another substance in the joint capsule that contributes to smooth joint movement by protecting the cartilage-secreting cells.  It, too, can dry up if there is insufficient joint movement.

passive movement of frozen shoulder

If your joints feel stiff, apply heat, like an infrared lamp for 20 minutes followed by active and passive stretching in all ranges of motion.  Movement will re-stimulate the secretion of synovial fluid and lubricin.   Do twice a day for two weeks, then as needed.  Infrared heat is a superior heat modality for the shoulder joint due to its ability to penetrate deep into the body.  I made a video that shows how to rehab shoulder joint pain using myofascial release and red light therapy, which you can view below if you have shoulder problems:

You really don’t want to go too long with achy, stiff joints because it typically worsens; often resulting in a “frozen” or locked joint that is prone to accelerated degeneration (osteoarthritis) and partial disability (the x-ray image below shows what advanced degeneration of the shoulder joint looks like). This is why joint exercises are so important, especially for those over age forty, the approximate age when the brain’s secretion of human growth hormone (HGH), the “fountain of youth” hormone sharply drops, causing connective tissues throughout the body to lose their resilience.  Just know that placing controlled, directional stress to your joints via these joint exercises will trigger your body to build them up, strengthening them.

shoulder x-ray showing osteoarthritis

Bottom line: Incorporate joint exercises into your workout routine.  Target the heavy use joints first—your shoulders, hips and knees.  Allowing your joints to weaken can lead to loss of support, joint degeneration, chronic pain, partial disability and reduced quality of life so make sure to strengthen those joints using the methods described above.

01/29/2020 UPDATE:  Just completed the video that shows some joint strengthening exercises for the Big Three:  Shoulder, Hip and Knee joints.

Arm, Wrist and Hand Pain From Overuse – Things You Can Do

When I ran a large chiropractic practice in San Francisco’s Financial District during the late 1990s to 2002 about half of the cases I saw involved upper extremity pain due to “overuse.”  They went by the names repetitive strain injuries (RSIs), cumulative trauma disorders, tendonitis, epicondylitis, carpal tunnel syndrome, stenosing tenosynovitis or just overuse syndrome.

Symptoms typically involved pain in the wrist tendons, forearm muscles and outer elbow; weak grip strength; shooting pains in the hands and sometimes loss of finger coordination.

Nearly all patients complained of neck and shoulder pains as well. About 20% were way beyond typical neck strain; these folks suffered an unusually pervasive pain that limited shoulder and neck movement enough to cause temporary disability (I had to take them off work). The neck and shoulder muscles were always rigid while the skin above felt unusually warm and a bit swollen/ boggy to the touch.

What could explain this surge of arm, wrist and hand pain from the late 90s to 2000s?

During this time frame, a couple of things occurred:

1. Laptops started entering the scene. This was significant, because up to this point people used a separate keyboard and monitor. And, they usually had the monitor raised on a monitor stand so you didn’t have to bend your neck down for so long. With the laptop, the monitor is connected to the keypad, forcing the user into an unfamiliar, awkward and ergonomically poor position. Neck and arm muscles were not accustomed to function in this position and experienced cumulative strain.

2. The internet developed, as well as desktop applications like Microsoft Office Suite. Employers saw how the internet could increase efficiency and job descriptions increasingly involved longer hours on the computer.

3. Mobile phones came on the scene, then smart phones. BlackBerrys (“Crack Berrys”) were all over the place, then the iphones. Like the arrival of the laptop these new devices caused people to assume postures that they weren’t accustomed to: forward craned necks multiple times throughout the day; thumb typing, slouching.

Wrist braces were a common site back then, and there was an increased incidence of carpal tunnel release surgery.

Now in 2017, you don’t hear much about repetitive strain injuries or carpal tunnel syndrome.  I think we’ve witnessed a sort of “micro-evolution” phenomenon, where the human body gradually adapted to using laptops and smart phones due to them being “forced” on the population, and can now handle longer hours in these awkward positions.

How Chronic Arm Pain Develops

But that doesn’t mean you are immune to these overuse injuries. If you have a job that involves prolonged sitting (about one hour+ straight) and keyboarding, then it is prudent to do things to avoid developing chronic pain in your upper extremities.  I’ve seen people who worked through arm and wrist pain because their job demanded it; then, a point was reached where the pain persisted even after weeks of resting their arms, and months after they left their job.

What typically happens is, with frequent typing you rapidly contract and relax the forearm muscles that move your hands and fingers. There are several of them tightly confined in a small compartment. These muscles and tendons are protected by tissue called bursae, which are basically frictionless pads so that they can rub against each other without much problem.

But if you continually engage in these movements the bursae basically dry out and lose their ability to protect the forearm muscles and tendons.  Friction increases causing small tears to form in the bursae and fascia (muscle covering), triggering inflammation and swelling. The inflammatory chemicals irritate the nerves in the arm, which can lead to things like numbness, tingling and shooting pains.

Then, scar tissue develops and undergoes sclerosis, or hardening and permanent thickening. Now you are stuck with hardened tissues rubbing against one other when you type, making matters worse. It leads to a perpetual cycle of arm, wrist and hand pain that persists with or without hand and arm exertion.

And don’t forget the neck and shoulders. As you know, it’s nearly impossible to maintain an erect sitting posture. After some time, your neck and back muscles fatigue causing you to slouch. The muscles in the neck shorten, and may even pinch your cervical plexus on one side—the bundle of nerves that go to the arm—leading to a condition called thoracic outlet syndrome. Symptoms of TOS include numbness in the arms and hands, swelling and a weak pulse.

For some people, the combination of neck, shoulder and arm pain is so bad they can no longer return to office work.

So what should you do?

First and foremost, taking periodic rest periods in between arm and hand work helps. Do neck, shoulder arm and wrist stretches during this time.

Secondly, take a hard look at your workstation ergonomics. Take note of the body positions and movement patterns required by your particular job function. Are there things you can arrange to minimize strain to your body? Think in terms of positioning frequently used equipment in a way that requires the least amount of exertion to your arms, wrists and hands. It could mean positioning the item closer to your body or further; higher or lower, and/or angled in a certain way.  The slightest adjustment in a frequently used item can make all the difference.

For desk workers, I highly recommend that you get an adjustable standing desk such as the VariDesk.  Set it to the standing height and stand for an hour; then effortlessly switch it back (takes all of five seconds) to the sitting position for half an hour, then back to standing.  Standing gives you better posture and is actually better for your low back than sitting although it is harder on your feet and knees.

Third, think like an athlete. An athlete makes his/her body strong in order to perform the best, and to handle the physical challenges of his/her sport.

Well, sitting and typing is not exactly a sport but like a sport it puts physical demands on certain parts of your body—your low back, neck, shoulders, arms and hands. Strengthen those areas using weights and whole body functional exercises. This will make your body resilient to the physically stressful position of sitting at a desk for 8+ hours a day.

Fourth, there is self-therapy. If you are developing pain in your arms and hands, consider doing massage therapy. Myofascial release and Active Release Technique (ART) are especially good for upper extremity strain problems. Ask around; these techniques are advanced “medical” massage techniques that not your typical massage therapist is trained to do.

If you want to try it yourself, I made a video that shows you a modified form of myofascial release using an edged instrument.

If you are having neck and shoulder issues, find a good chiropractor and get some adjustments to those areas. Adjustments can help loosen fixated joints, removing pressure to nerves and blood vessels that service your arms.

Last but not least, use nutrition as therapy. Like a marathon runner who needs certain nutrition to recover from muscle breakdown in the legs, those whose job requires frequent arm and hand exertion at work should use nutrition to compensate for muscle breakdown in the upper extremities.  I recommend green juice, whey and anti-oxidants.

Click here for the specific, nutritional supplements I recommend for maintaining good musculoskeletal health.

Bottom Line: Your arms and hands are indispensable to you. If you have a job that requires frequent keyboarding or other use of hands and arms, take preventive action to ensure you don’t develop chronic strain. Most of the best things you can do to achieve this, you can do on your own, without a doctor.

Till next time,

Dr. Dan
Treat Shoulder Joint Pain with Red Light and Infrared Therapy

Treat Shoulder Joint Pain with Red Light and Infrared Therapy

 Light in the visible red spectrum has noted therapeutic benefits, and it does this by enhancing cellular energy and signaling reactions involved in tissue healing.  When an injured cell has more available energy, it can repair itself faster and activate certain other biological processes involved in healing.  Red light in this wavelength does not generate heat, so heat isn’t doing the healing.  It’s photobiomodulation at work– a human version of photosynthesis, the process by which plant life creates food for itself using sunlight.

Because of its wavelength range (about 620-880 nm) red light tends to get absorbed by water-dominant human tissue, especially red blood cells.  Just beyond the visible red on the spectrum of light is infrared light (IR), which is not visible to the human eye, but still has therapeutic benefit (most of the heat radiating from the earth is infrared).  Infrared has a higher wavelength and can penetrate deeper into human tissue.  In fact, acupuncturists and physical therapists rely on infrared heat lamps to apply heat to deep joints such as the shoulder, hip and knee.

Since they are considered generally save for use, the FDA allows manufacturers of red light and infrared therapy devices to sell directly to the consumer, without a doctor’s prescription.   Those who have photosensitive skin however my want to speak with their doctor first before trying red light therapy, as it may cause pigmentation.

There are numerous red light and infrared devices on the market for personal use; some better than others.  They include hand held devices, mats and lamps.  There are even portable infrared saunas.    For small areas such as an ankle, wrist or shoulder, you can use a portable, hand-held red light device..  This is a stainless steel, high quality compact device resembling a small flashlight.   It uses three (3) diodes; each putting out a different red light frequency, which means it penetrates to different depths in your tissues thus bathing a larger area with red light.   3-4 three- minute doses, twice a day for three days is a good protocol for most conditions.

For larger areas such as low back pain or spasm or leg pain after running, try an infrared lamp or sauna.

The Shoulder Joint – A Complex Joint Vulnerable to Breakdown

Ok, let’s talk about treating common shoulder joint pain.  The shoulder joint, or glenohumeral joint is a ball and socket type synovial joint.  Unlike the hip joint, the shoulder joint has a shallower articulation point with the scapula that allows it to move as it does — in wide arcs and in multiple planes (try doing that with your knee!).  It is enclosed by the rotator cuff, which is basically formed by the several tendons attached to the humeral head (the proximal end of your humerus, or upper arm bone) and capsular ligaments that connect the humerus to the other end of the shoulder joint, the glenoid fossa of the scapula, a shallow bowl-shaped indentation.

There are six muscles that move the shoulder, and therefore six tendinous attachment points. Above and around the ball of the shoulder joint are bursae, which are jelly-like pads that serve to reduce friction during shoulder movement.   Inside the shoulder joint capsule itself is the synovial lining (this is the tissue that gets inflamed in cases of rheumatoid arthritis), the cartilage lining the ends of the ball and socket surfaces and the labrum, a rigid cartilaginous support structure that helps position and stabilize the humeral head onto the glenoid fossa. As you can see, your shoulder joint has many structures involved in its function.  This means there are more chances for something to go wrong– a tear, a strain, a malposition, compared to a simpler joint like a knuckle.

If you have pain and/or clicking noises (called crepitus) in your shoulder or have restricted movement such as limited ability to raise your arm above shoulder level, something is obviously wrong.  It could be a rotator cuff tear (tear of tendons and or capsular ligament); labral tear, bursitis (inflammation of a bursa), thickening of the supraspinatous ligament due to shoulder subluxation (malposition of joint), arthritis or fluid build up. Stretching alone may not be feasible, especially in cases like adhesive capsulitis (frozen shoulder) due to the pain. This is where red light therapy and infrared can help.

How to Apply Red Light to Your Shoulder Joint Where It’s Needed

The challenge when applying red light to your shoulder joint is getting it to the damaged structures, which is not straightforward. The glenohumeral joint is covered by the deltoid muscle, which can be quite developed especially in men.   It is thickest in the belly of the muscle (center, meaty part) but thinner on its tendinous ends where it inserts into the scapula and collar bone.  Avoid the belly of the deltoid as red light cannot pass through it, and apply the red light over the thinner areas noted.  Also, don’t forget that you can access the shoulder joint underneath, via your axilla (arm pit).  This is a great technique, as there are no muscles obstructing it (see third image below).

Below is a diagram of shoulder anatomy to give you a  better idea on how to target critical structures like the shoulder bursae, tendons and capsular ligaments when using red light therapy.  You’ll want to use a hand-held red light therapy device that can focus the light over a small area of about 2 cm.

shoulder-images

 Palpate your shoulder and locate the locus of pain.  Internally and externally rotate your shoulder joint and press in front, on top underneath and behind it with your index finger to find tender spots. Once you’ve found one, keep your shoulder in that position and apply the red light for 60 seconds.  Do this 3-4 times.  You may want to move to areas around the sore spot, for good measure.  The thin, small space just under the “cliff” of the acromion process is an ideal spot to focus the light.  It will get absorbed by the subacromial bursa and supraspinatous tendon, common sources of shoulder pain and stiffness. Do this over a week to ten days, and you should notice improvement.  Avoid overly-stressing your shoulder joint during this time period to allow proper healing. Below is a video where I show you how to do it.

In summary, you can accelerate tissue healing in sprains, strains, bruises and minor cuts using red light therapy.  These devices are a great addition to your home therapy devices, as they do not require a medical license to acquire.


Exercises for stiff and achey shoulder joints

Dansk: Skulderled. Français : A. B. Acromion C...

Dansk: Skulderled. Français : A. B. Acromion C. D. E. Tendon du biceps F. G. H. Processus coracoïde I. J. Clavicule K. Humérus. A = , B = Acromion, C , D , E = Tendon du biceps , F = , G = , H = Processus coracoïde , I = , J = Clavicule, K = Humérus (Photo credit: Wikipedia)

The shoulder is a complex body system tasked with moving the arms.  It is comprised of the shoulder  blade (scapula), collar bone (clavicle), humeral head (nearest end of the upper arm bone) and the breast bone (sternum), and associated muscles, ligaments and tendons that hold it together and move it.

When a patient complains of shoulder pain, it could mean pain in any of these areas.  The doctor has to ask the patient to point to the precise area of pain, and ask the patient to move the arm and shoulder to get a better idea of what is causing the pain.

Today we’ll talk about general ache in the glenohumeral joint, comprised of the humeral head and glenoid fossa of the scapula (the shallow cup-shaped  surface of the scapula).

First of all, realize that the glenohumeral joint has the widest range of motion of all the joints in the body.  You can do all sorts of movements with your shoulder joint– raise your arm from the side, the front, the back; transcribe small and large circles, hug yourself, spread your arms far apart; throw a football, and throw an underhand pitch– that’s a lot of movement, compared to, say, the knee.  In order to accomplish such a wide range of motion, there has to be a lot of moving parts (ligament and tendon attachments).  When you have a lot of moving parts, there is a greater chance of something breaking down.  And this is why shoulder problems are quite common in people.

A general ache in the glenohumeral joint can be the result of sleeping on your shoulder; an old injury, or simply over-using it.  Tendons that slide over bony surfaces to move the shoulder joint in its many directions may be pinched in the narrow confines of the glenohumeral joint.  It makes the shoulder feel stiff and achey.

NOTE:  feeling a very deep and sharp, focal pain in the glenohumeral joint that is worse with a particular angle of arm movement is a different presentation and is not what we’re addressing here.

This is about general achiness and stiffness that does not cause any weakness or disability of the shoulder.  If you have more of a sharp pain that doesn’t go away with rest or medications, refrain from doing the following exercise until you see a doctor who can properly diagnose your problem.

TREATMENT:

You will be doing gentle stretches to get the shoulder joint moving, eventually without the achey and stiff feeling.

First, let’s assume it’s your right shoulder that has the problem.  Stand with your left foot about a foot forward of your right foot.  Bend at the waist but keep your lower back straight, and rest your left hand on your left knee.

Let your right arm hang limp straight down.  Sway your body in circles to get your limp right arm to transcribe a clockwise circle shape.  Try not to use your right shoulder muscles themselves, let the rocking movement move the shoulder.  Do ten circles, then reverse directions. Do 5-6 times a day.  If you do it correctly, the mere weight of your right arm will traction the glenohumeral joint (slightly pull apart the surfaces) and the rotation movement will stretch the ligaments in all directions.

Try adding a small weight, in increments throughout the week (do not exceed ten pounds max) to increase the amount of traction.  You should feel a gradual loosening of the shoulder joint, and less pain.  Avoid sleeping on the affected shoulder for a few weeks.

The other exercise is more challenging, so only do it if the pain has gone down considerably.  Take a bath towel and roll it length wise.  Grab one end with your right hand, and raise that hand (90 degree elbow bend, upper arm at level of shoulder).  Reach behind you with your left arm and grab the other end of the towel with your left hand.  Now, extend your right elbow back and forth as though you are drying your back with the towel.  Do for about a minute, and then switch hands.  Repeat.

As always, if any of these exercises cause an increase in pain, stop immediately.

Receive a FREE, 30-Day Plan to Boost Your Health and Eliminate Pain!

Receive a FREE, 30-Day Plan to Boost Your Health and Eliminate Pain!

As a subscriber, you'll also learn the special methods used by experts in human biomechanics to fix body aches and pain the RIGHT way, long term. 

We'll also send you a Free eBook, Concepts of Self-Healing as a way of saying thanks.

Please check your email in 5 minutes to access your Special Report. Make sure to whitelist "newsletter@painandinjurydoctor.com" in your email client (Gmail, Yahoo, Outlook, etc.) so that you don't miss this valuable information. One way is to add this email to your email Contacts.