Stenosing Tenosynovitis

original Finkelstein's Test, as described by H...

Image via Wikipedia

Stenosing tenosynovitis translates to “tendon inflammation due to narrowing passageways.”  It is entrapment and inflammation of the extensor pollicus longus tendon, the muscle that moves the thumb up in a “hitchhiker sign.”   It is also known as DeQuervain’s Syndrome.

The passageway in question is a tunnel formed by ligaments that hold the extensor pollicus longus tendon to the distal radius (lateral wrist), one of the two bones of the forearm.

The onset is gradual over a few days.  There is a very sharp, unrelenting pain at the radial styloid, the bony prominence at the lateral wrist right below the wrist crease.  There is no loss of muscle strength in the thumb.  Bending the affected thumb inward towards the palm while bending the wrist sideways towards the ulna (in direction away from the pain) makes the pain much worse.

Causation is believed to be related to overusing the thumbs, such as BlackBerry use, or frequent bending of the wrist while carrying weight, such as in cradling a baby several times a day.  However, there are documented cases of stenosing tenosynovitis occurring with no apparent trigger (idiopathic causation).

What is known is that the synovial sheath that covers the portion of the tendon in the tunnel gets inflamed and undergoes degenerative changes.  It triggers a chronic, localized inflammatory response.  Pain comes from tiny nerve endings in the synovial sheath that are irritated by rubbing against the ligament holding it to the distal radius, and perhaps also by exposure to the products of inflammation.

The condition is known to be self limiting, running its course for a few months and then resolving as the body regenerates the synovial sheath.  However, during its acute stage it is quite unpleasant, despite the fact that only about an inch of tendon is involved.

TREATMENT:

Wrist immobilization (wrist brace with thumb splint) to limit movement of the adductor pollicus longus is recommended for 1-3 weeks.  Wear most of the day and night; remove every hour or so to do ice therapy.

Ice massage is helpful in temporarily reducing the pain by numbing the area and constricting blood vessels, which tends to suppress production of inflammatory chemicals.  A wrist ice wrap can also be effective.   Apply ice for 10-20 minutes directly onto the painful area.

Topical ointments may be helpful in reducing the severity of the pain.  Narayan oil and products containing capsaicin (don’t use together) are worth trying.  Rub into inflamed tendon gently.

Chinese herbal patches may be helpful in temporarily relieving the pain as well.

Cortisone injection into the tunnel can be effective in neutralizing the pain; however it still may take a few weeks to months for the pain to go entirely away.

Whey Protein – Great Supplement for Healthy Tissue Healing

Skeletal muscle Bone Perimysium Blood vessel M...

Image via Wikipedia

Whenever you suffer an injury to the musculoskeletal system, there is some degree of tissue damage.  In minor sprains and strains, it is microscopic tears to the fascia, muscle fibers, tendons and ligaments; in major sprains and strains it is complete rupture or tearing of large groups of muscle, ligament and/or tendon fibers.

The first thing the body does at the onset of the injury is initiate the inflammatory response.  Various biochemicals constitute inflammation; each having an important role.  Inflammation confines the injury to the injury site and is actually the first step in tissue repair.  It is only when it is overproduced that it becomes a problem in itself (which is why you should use ice therapy to mediate swelling  the first few days after an injury).

At some point, the body sends special cells called fibroblasts to the injury site.  These cells synthesize connective tissue comprised of collagen to close the tears of the injury.

Collagen is the main protein of connective tissue in animals, making up 25%-35% of the total protein content .   It forms as elongated fibrils (long chain of amino acids in a strand formation) and is mostly found in fibrous tissues such as tendon, ligament and skin, as well as other places in the body.

Therefore, after sustaining an injury, the body needs a ready supply of protein in order to properly heal itself.  If you recently sustained a soft tissue injury such as a sports injury to a joint, whiplash car accident, or sprained your lower back from heavy lifting, make sure you are eating enough protein.   I recommend whey protein due to its ability to be digested very rapidly, making it available for use shortly after consumption.  Whey is a protein-rich byproduct that is formed during cheese formation, usually from cow’s milk.

Body builders and athletes drink whey protein shakes after workouts to help increase amino acid levels in the blood, which are taken up by the muscles to ultimately increase mass. During exercise, whey helps improve blood flow by inhibiting an enzyme that constricts blood vessels; this allows better flow of nutrients to needed areas to help repair and rebuild muscle tissues.

Leucine is an amino acid found in whey protein shakes.  When leucine is ingested in high amounts it stimulates protein synthesis, which may speed recovery and adaptation to the stress that occurs from heavy exercise and injuries.

Another good source of protein is eggs.  Eggs are a complete source of protein, especially the yolk.  Cook them at low heat; and if you have the stomach for it, eat them raw.

Exercises for stiff and achey shoulder joints

Dansk: Skulderled. Français : A. B. Acromion C...

Dansk: Skulderled. Français : A. B. Acromion C. D. E. Tendon du biceps F. G. H. Processus coracoïde I. J. Clavicule K. Humérus. A = , B = Acromion, C , D , E = Tendon du biceps , F = , G = , H = Processus coracoïde , I = , J = Clavicule, K = Humérus (Photo credit: Wikipedia)

The shoulder is a complex body system tasked with moving the arms.  It is comprised of the shoulder  blade (scapula), collar bone (clavicle), humeral head (nearest end of the upper arm bone) and the breast bone (sternum), and associated muscles, ligaments and tendons that hold it together and move it.

When a patient complains of shoulder pain, it could mean pain in any of these areas.  The doctor has to ask the patient to point to the precise area of pain, and ask the patient to move the arm and shoulder to get a better idea of what is causing the pain.

Today we’ll talk about general ache in the glenohumeral joint, comprised of the humeral head and glenoid fossa of the scapula (the shallow cup-shaped  surface of the scapula).

First of all, realize that the glenohumeral joint has the widest range of motion of all the joints in the body.  You can do all sorts of movements with your shoulder joint– raise your arm from the side, the front, the back; transcribe small and large circles, hug yourself, spread your arms far apart; throw a football, and throw an underhand pitch– that’s a lot of movement, compared to, say, the knee.  In order to accomplish such a wide range of motion, there has to be a lot of moving parts (ligament and tendon attachments).  When you have a lot of moving parts, there is a greater chance of something breaking down.  And this is why shoulder problems are quite common in people.

A general ache in the glenohumeral joint can be the result of sleeping on your shoulder; an old injury, or simply over-using it.  Tendons that slide over bony surfaces to move the shoulder joint in its many directions may be pinched in the narrow confines of the glenohumeral joint.  It makes the shoulder feel stiff and achey.

NOTE:  feeling a very deep and sharp, focal pain in the glenohumeral joint that is worse with a particular angle of arm movement is a different presentation and is not what we’re addressing here.

This is about general achiness and stiffness that does not cause any weakness or disability of the shoulder.  If you have more of a sharp pain that doesn’t go away with rest or medications, refrain from doing the following exercise until you see a doctor who can properly diagnose your problem.

TREATMENT:

You will be doing gentle stretches to get the shoulder joint moving, eventually without the achey and stiff feeling.

First, let’s assume it’s your right shoulder that has the problem.  Stand with your left foot about a foot forward of your right foot.  Bend at the waist but keep your lower back straight, and rest your left hand on your left knee.

Let your right arm hang limp straight down.  Sway your body in circles to get your limp right arm to transcribe a clockwise circle shape.  Try not to use your right shoulder muscles themselves, let the rocking movement move the shoulder.  Do ten circles, then reverse directions. Do 5-6 times a day.  If you do it correctly, the mere weight of your right arm will traction the glenohumeral joint (slightly pull apart the surfaces) and the rotation movement will stretch the ligaments in all directions.

Try adding a small weight, in increments throughout the week (do not exceed ten pounds max) to increase the amount of traction.  You should feel a gradual loosening of the shoulder joint, and less pain.  Avoid sleeping on the affected shoulder for a few weeks.

The other exercise is more challenging, so only do it if the pain has gone down considerably.  Take a bath towel and roll it length wise.  Grab one end with your right hand, and raise that hand (90 degree elbow bend, upper arm at level of shoulder).  Reach behind you with your left arm and grab the other end of the towel with your left hand.  Now, extend your right elbow back and forth as though you are drying your back with the towel.  Do for about a minute, and then switch hands.  Repeat.

As always, if any of these exercises cause an increase in pain, stop immediately.

What to Do if You Have a Bulging Disk

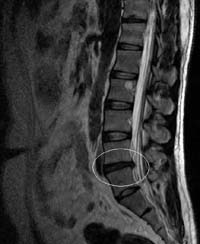
MRI Scan of Lumbar Disc Herniation

Image via Wikipedia

Lower back pain presents in a range of severity depending on the structures generating the pain.

A simple sprain/strain can still cause extreme pain, swelling, and immobilization for a couple of days but should completely resolve after a few weeks with proper care and rest.  Lumbar sprain/strains are associated with lifting something heavy, or even simply bending or twisting at the waist; weight lifting, sports injuries and trauma like a car accident.  By definition, they are limited to injury to the muscles, fascia, tendons and ligaments.  The pain is limited to the area of injury.

annotated diagram of preconditions for Anterio...

Image via Wikipedia

A lumbar disc bulge occurs when a disc “bulges” outwards due to weakness or injury.  A disc is a tough, fibrous ligament that holds the lumbar vertebrae together at the vertebral body.    The disc’s outer periphery, called the annulus, resembles a slice of an onion, with multiple rings of fibrous tissue encasing a jelly-like material called the nucleus pulposus.  While tough and strong, it allows movement of the individual vertebrae.

By definition, a disc bulge is still intact and has not ruptured (as opposed to a disc herniation or rupture).  The bulge represents a weakened area in the annulus that allows the nucleus to gravitate towards a section of the periphery, usually the posterior (rear-facing) edge, facing the spinal canal (where nerve tissue is present).  It can be a broad-based bulge, or a more focal bulge.  If it is greater than 5mm (measured from the edge of the vertebral body to the tip of the bulge) it is clinically significant.  Many people have disc bulges and have no back pain at all; in fact, it is normal for the discs to bulge slightly in the weight bearing position (standing).

The problem occurs when the bulge contacts nerve structures.  If large enough, they can contact the thecal sac (contains the spinal cord and cauda equina) by bulging backwards into the canal, and they can press on spinal nerve roots by bulging to the sides.  The spinal nerve roots branch out in pairs from either side and exit holes formed between adjacent vertebrae called vertebral foramen, or lateral canals.  A disc bulging to the posterior and side can narrow this opening and pinch the nerve root causing pain to travel down the buttock or leg, depending on which nerve root.

TREATMENT:

If your lower back pain is felt deep, and you can make it hurt more by bending your lower back backwards and to the side, you may have a disc bulge.  You may or may not have pain and/or numbness going down the buttock and leg (same side of the pain).  If it happened while lifting something heavy, the diagnosis is more likely.  If you have extreme, unchanging pain with more constant leg pain or paresthesias (numbness, tingling) that does not get better with ice and rest, you may have a disc rupture (also called prolapse) where the inner nucleus had broken through the annulus and is in the spinal canal or lateral canal.  If you have changes in your gait (walk) such as foot drop, weakness in your legs, difficulty walking upstairs, then the diagnosis of disc prolapse  is more probable.

Disc bulges can be managed with conservative treatment like home care, chiropractic, and physical therapy.  Disc prolapses should be evaluated by an orthopedic surgeon or neurosurgeon.  An MRI should be ordered to evaluate the extent of the injury.

If you suspect you have a disc bulge, take care not to aggravate it.  No heavy lifting, no jumping activities (basketball, badminton– anything where your feet leave the floor and land hard).

Discs usually bulge backwards (posterior), so do movements that encourage the bulge to move back to center.   Lie on your back and bring both knees to your chest (ok to use your arms to grab your knees while they are bent, and pull and hold to your chest).  This will put your lumbar spine in flexion, or a nice convex curl.  Your back contour should be like that of an egg, and you should be able to rock back and forth.  Maintain the pull, stretching your lower back into this curve.   Hold for 30 seconds, then slowly extend your legs on the floor and rest for 15 seconds (optional:  put a frozen ice gel pack covered with a kitchen towlette under your lower back during this exercise).  Repeat six times.  This will have the effect of creating separation between the posterior ends of the lumbar vertebrae, helping to reduce the bulge.

Next, stand and place your hands on your hips, and slowly arch your back backwards, putting your lumbar spine into extension— the opposite curvature as the previous exercise.  Bend back until you can’t anymore, but don’t over do it.  Hold this position for six seconds, then return to neutral.  Repeat eight times.  This will have the effect of bringing the posterior ends of the lumbar vertebrae closer together and pushing the nucleus back towards the center.

Do the above series of exercises three-four times a day for a week until the discomfort is gone.  At this point, you should focus on doing things to strengthen the disc.  Eating a wholesome, healthy diet with enough protein, fat and plant material will help; avoiding destructive activities like smoking, alcohol, and staying up late will enable optimum conditions for tissue healing.  Gradually start doing exercises that improve lower back muscle conditioning and coordination.

Getting a series of 6-8 chiropractic adjustments to the lumbar spine may also  be helpful in reducing your bulging disc.

How to Relieve Pain from Hot Peppers

Habanero pepper

Habanero pepper (Photo credit: Wikipedia)

Peppers contain a substance called capsaicin that gives them that hot sensation when exposed to thin membranes such as in the mouth, eyes, nose, and open wounds on the body.  The amount of capsaicin determines the “hotness” of the pepper.  Bell peppers are on the low end, while habanero peppers are on the high end.

Research shows that capsaicin, despite its fiery reputation can reduce inflammation.  There are now over the counter pain relief products that contain capsaicin, mostly topical applications.  The capsaicin creates a mild burning sensation on the skin, resulting in a counter-irritant effect that may temporarily relieve muscle pain.

Some people may apply too much of the product on their skin and suffer from a very uncomfortable burning area on their body that doesn’t go away with soap and water.  If you find yourself in this situation, here are some suggestions:

1.  Rub coconut oil over the area.   You can buy virgin coconut oil in most health food stores.  It is even better if it is in a  solidified state (below melting temperature).

2.  If it is a case where you ate a pepper, don’t try to wash it out with icewater; instead, gargle whole milk for 30 seconds; spit out.  Repeat three times.

You can experiment with other types of fats such as olive oil, lard, and butter.

Before handling very hot peppers in preparation for cooking (especially if you are going to slice them and expose the capsaicin) coat your hands in olive oil.

By all means, do not touch the eyes and nose during the handling, and even several minutes after you’ve handled very hot peppers and washed your hands, just in case.

What Can Be Done About Meniscal Tear?

Capsule of right knee-joint (distended). Poste...

Image via Wikipedia

The meniscus is a shallow bowl shaped piece of cartilage that is attached to the lower leg bone, or tibia.  There is a medial meniscus (inner half of knee) and a lateral meniscus (outer half of knee).

The end of the femur (upper leg) bone has two protuberances called the femoral condyles, which rest on top of the meniscii (plural).  In the standing position, the meniscii bear the full weight of the body above the knee.  They serve as a cushion and shock absorber and protect both of  the ends of the tibia and the femur.  The meniscus also guide the action of the femoral condyles as you bend and extend your knee.

The knee is obviously a highly utilized, weight bearing joint.  It has the largest suface contact area of any joint in the body as it has to bear most of the body’s weight and on top of that, absorb shock from walking, running and jumping.  It is held together by several strong ligaments, the primary being the anterior and posterior cruciate ligaments (ACL, PCL), the medial and lateral collateral ligaments (MCL, LCL), and the patellar tendons.  It is a synovial joint, which means it is totally encapsulated and lined with synovium, a specialized tissue that secretes synovial fluid to lubricate the joint.

The slightest alteration in the inner workings of the knee will lead to problems.  A common one is a meniscal tear.  The two basic types are a radial meniscal tear and a vertical meniscal tear.  A radial tear that expands forms what is called a “bucket handle” tear (3rd set in the below image- top and bottom).

types of meniscal tears

Meniscal tears are caused by excessive pounding forces to the knee, which weaken the meniscii over time.  Eventually a tiny tear forms, which grows in length as the individual continues to engage in the offensive activity (running on hard pavement, weight lifting, playing basketball, etc.), much like how a tiny crack in a car windshield grows into a long crack over time .  If a small piece breaks free, it floats inside the knee space, suspended in the synovial fluid.  Like a grain of sand in a watch, it interferes with the moving parts and can cause the knee to swell and become stiff..  Pain is felt deep inside the knee and is worse with prolonged standing and transitioning from sitting to standing.

Meniscal tears increase the chances of accelerated knee osteoarthritis, as “bone on bone” contact occurs between the ends of the femur and tibia.

TREATMENT:  Diagnosis is made with a knee MRI and arthroscopy.  Meniscal tears will most likely require arthroscopic surgery involving repair to the tear.  If you have a gradual onset of deep, focal knee pain accompanied by knee stiffness that doesn’t go away, see your doctor.

Prevention, as always, is the key.  I advise against sports that involve consistent and prolonged pounding forces to the knee.  This includes long distance running and frequent hard court basketball that involves jumping.  Consider doing functional exercises that combine cardio and strength instead.

Most leg exercises will strengthen the knee.  Do mostly closed kinetic chain exercises where the foot is immobilized.  This includes squats and lunges.

Intermittent jumping exercises are ok as long as they are controlled and are not the focus of an exercise session.  Power jumps and related plyometric exercises fall into this category.

Most meniscal tears grow too large to heal on their own by the time the patient seeks medical help.  This is why surgery is the only option.  The surgeon stitches together the tear, but thanks to the forces the knee has to endure, the tear often returns.

Some patients do not get surgery, and let the tear become chronic.  When it’s chronic, there is less acute pain, and more of a broad, dull pain in the knee.  In this scenario, the knee joint will experience accelerated degeneration, leading to knee osteoarthritis.  Eventually in the later years, knee replacement surgery is needed.

I made a general Knee Pain Rehab instruction video that includes things one can do to help deal with early stage knee pain.

How to manage lower back strain

Low back pain is said to be the most common cause of lost work days, after the common cold.  Most everyone has experienced an episode of lower back pain at some point in their life; millions suffer from chronic (ongoing; unending) lower back pain of some form.

The low back, or lumbar spine, is comprised of the last five (5) vertebrae in the spine.  These vertebrae are the largest as they support most of the body’s torso weight.  Like the cervical spine; i.e. neck (the first 7 bones of the spine), there are no rib attachments in the lumbar spine to limit movement, making the lumbar spine more moveable than the thoracic spine (torso), but less flexible than the cervical spine due to its larger, heavier vertebrae.

This unique lumbar spine design offers advantages and disadvantges.  The obvious advantage is flexibility–you can bend (flex) your low back forward, backward, sideways, and can rotate it a few degrees to either side.  The disadvantage is  that with more movement, there are more opportunities to stress the joints of the lumbar spine (more moving parts) and therefore more chance of injury and pain.  This includes potential injury/ trauma to the surrounding ligaments, joint capsules, cartilage lining the small joint surfaces; small facet joints, intervertebral discs, and the lumbar vertebrae themselves.

Therefore, low back pain can originate in one of several structures in the lower back:

  • the discs (strong fibro-cartilage ligaments that hold vertebrae together)
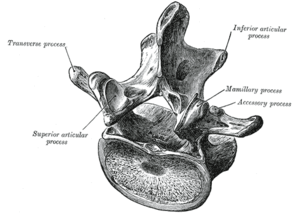
  • the facet joints (the “rear” joints of a vertebra, opposite the vertebral
    Lumbar vertebra.

    Image via Wikipedia

    bodies)

  • the pars– the small extensions of bone to either side of the vertebrae that form the upper and lower borders of the intervertebral foramen, and end in the lumbar facet joints
  • the surrounding muscles
  • the surrounding fascia (muscle covering)
  • the nerve roots inside the spinal canal
  • the vertebrae itself (compression fractures; vertebral end-plate fractures)

Today we’ll address lower back pain due to muscle and fascia strain.   I’ll refer to this a low back or lumbar strain.   This is a common cause of lower back pain and is more manageable than pain due to deeper spinal structures.

In the many cases of lower back strain that I’ve treated over the years, the patient describes a sudden onset of pain after bending at the waist reaching for something.  In other cases, the pain starts a day after doing something like weight lifting, running or rock climbing.

Medically speaking,  a muscle sprain-strain occurs when muscle fibers tear during contraction and subsequently release inflammation.

The convention for naming soft tissue injuries is that strain refers to injury to a muscle and tendon while sprain refers to injury to ligaments, which connect bone to bone.   Since muscles, ligaments and tendons typically get injured all at once in a typical injury due to their anatomical proximity to one another, doctors refer to these types of injuries as sprain-strain injuries.

Sprain-strain severity is described as Grade I, Grade II and Grade III, with Grade III being the most severe and refers to complete rupture of a tendon or ligament.  Most lumbar strains are Grade I and II.

Inflammation is meant to contain/ quarantine an injury and is actually an important process in the healing phase (tissue regeneration).  The problem is that it releases chemicals that irritate nerves and surrounding tissues, and stiffens adjacent muscles and joints.  The inflammatory response can “overshoot” causing the patient to needlessly suffer.

If you go to your doctor complaining of lower back strain, and tests do not indicate damage to deeper structures (discs, facet joints, nerve roots, bone) then you will most likely be prescribed pain blockers (usually NSAIDs- non-steroidal anti-inflammatories), rest, and ice.  Your doctor will likely put you on “temporary disability” which means no heavy lifting,  bending at the waist, and other activities that put stress on the lower back.  Sometimes muscle relaxants are prescribed, if there are complaints of spasm and stiffness.  You will be told that it should resolve on its own, and most cases do.

TREATMENT:

At first onset of straining your back, apply ice for 20 minutes every two hours of the waking day.   The easiest way in my opinion is to get a large freezer ziplock back, fill a third of it with ice cubes, put about a cup of water in the back and zip it closed (get as much air out as possible before closing shut).

Lie down so that your exposed (no clothing) lower back is directly on top of the bag.  Bend your knees or put a pillow under them for comfort.   This flattens the lower back and allows it to make good contact with the icepack. (Optional:  put a neck roll under your neck for comfort).  Do this for 1-2 days.

On the second day, you can introduce gentle stretches while you ice.  After your 20 minutes of icing, try lifting your knees to your chest, pulling them gently towards you with your hands.  Hold for 5 seconds; repeat five times.  Then, keeping your feet together (you are still lying on your back), knees bent, let the knees fall to the right side, gently twisting the lower back; reverse sides.  Do five times to each side.  What these movements do is orient any scar tissue that develops, in the direction of contraction.

On the third day, assuming pain is still present, you can try using heat.  I recommend an infrared lamp.  This is radiant heat that penetrates deeper than a hotpack.

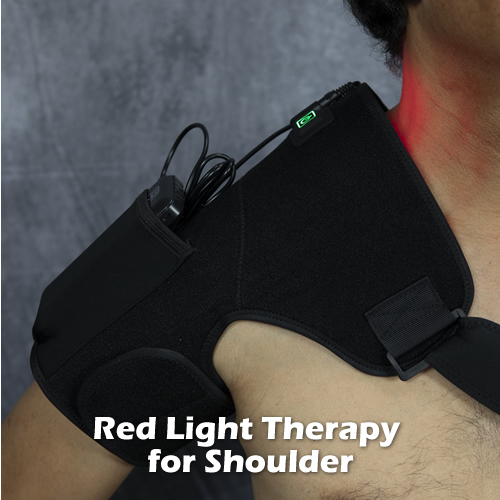
If you need to get pain free even sooner, I suggest using the 120 LED (Light Emitting Diode) wrap.  This popular home therapy device used red light therapy + infrared heat, which goes beyond simply blood circulation increase.  The red light diodes inhibit inflammation and increase cellular metabolism (energy production, waste removal) which means speedier tissue healing.

After a week, your lower back strain should be 60-90% better.   If it is only 25% or so improved after a week, the injury is likely worse than originally thought; and deeper soft tissues may be involved.  In this case, consider using Pulsed EMF to further enhance tissue healing.

Last thought:  I believe that if someone strains his lower back by simply bending forward, it indicates that the back muscles, and probably core/abdominal muscles need better conditioning.  It’s not all about strength, it’s also muscle coordination in response to varying loads; for example, picking up a piece of heavy luggage.  Those with excellent muscle coordination (there are five major muscle groups that have to work together to move the lower back) are less likely to injure their backs like this.  Interestingly, research shows that osteoarthritis, or degenerative joint disease in the lumbar spine, is related to poor lower back muscle coordination.  And it makes sense– your muscles move and support your lumbar spine.  Poor support and coordination between muscles (erector spinae group, abdominals, etc.) can cause your spinal joints to bear more stress than normal during every day movements.

So, the best strategy is to prevent getting lower back strain by strengthening AND conditioning (improve coordination of) your lower back muscles by doing functional exercises.

What is Causing My Heel Pain?

Lateral X-ray of a Calcaneum demonstrating a spur.

Image via Wikipedia

Heel pain can be caused by a number of factors.  One of the most common is a heel spur, medically referred to as a calcaneal spur.

A heel spur is an outgrowth of bone in the shape of a small spire.  If it’s at the bottom or side of the heel bone (calcaneous), it can be painful to walk.  It is thought that heel spurs form as a result of stress on a tendinous insertion into to the heel, but some heel spurs aren’t associated with the area where a tendon inserts into the heel.

Whenever offshoots of bone form (bone spurs), it is due to a history of stress to the bone, either gradual formation following a single impact trauma such as a car accident; or cumulative impact forces over time, such as from sports.  For the foot bones, an example of the latter would be years of playing basketball or ballet dancing.  The repetitive pounding on the joints of the foot can cause bone cells at the impact area to secrete more bone matrix as a compensatory response.  In the spine and large weight bearing joints (knee, hip) they are called osteophytes.

In some cases, the heel spur stops producing pain; perhaps due to resorbption or even callous formation neutralizing its ability to press against tissue. For those that don’t, surgery can be done by a podiatrist or orthopedic surgeon to smooth down the heel spur.

TREATMENT:

In the meantime, avoiding impact trauma to the heel is important (running, jumping).  You can buy special shoe inserts that help reduce pressure on the heel spur.  Comfortable shoes are a must as well; make sure they are wide and have a thick rubber, shock absorbing sole.  The Z-Coil shoe brand incorporates a large spring at the heel to minimize shock/ impact forces to the foot when walking.

Sitting in a chair and rolling a cold beer or soda can (unopened) under your foot can help stretch the foot and ease some of the pain.  A golf ball can provide more focused massage to the bottom of the foot.  Press downward with enough pressure to get a good stretch and massage, but not so much to increase the heel pain.

Dorsal and plantar aspects of foot

Image via Wikipedia

Lastly, consider exercising your feet by walking barefoot around the house and outside (walking barefoot indoors is not as effective due to the flatness of the floor; bumpy and uneven is better).  Walking in shoes actually weaken the foot over time by preventing the intrinsic foot muscles and joints from exercising and experiencing their full range of motion.  You can also consider getting the Vibram foot glove.  This interesting shoe fits on your foot like a glove, allowing some independent movement of the toes.

Plantar fascitis is a condition where the plantar fascia (a wide, band-like ligament connecting the heel to the forefoot) pulls off a thin layer of periosteum (membrane lining the bone) from the heel and results in inflammation and pain at the front, bottom part of the heel.  It can make walking very uncomfortable.

The best approach to treating plantar fascitis is to rest your foot for a few days:  no running, no walking up hill; walk only on flat surfaces.  Use Red Light Therapy and Pulsed EMF for 15 minutes, twice a day for 2-3 weeks to accelerate healing of tissues, and for reducing any inflammation that is causing pain.  Red light therapy uses photobiomodulation to accelerate cell metabolism; thus accelerating healing of tissues.

Compression fractures and hairline (stress) fractures can also cause heel pain.  If you think you’ve fracture your heelbone, have it X-rayed.   You’ll likely get a foot cast, avoid impact to the heel for several months, and wait until the fracture heals (no pun intended).

If your heel bone fractures easily, it could be due to a bone cysts.  See your doctor on solutions for dealing with bone cysts.

Carpal Tunnel Syndrome

A rigid splint can keep the wrist straight.

Image via Wikipedia

Carpal tunnel syndrome is a condition where one of the major nerves of the arm gets compressed in the wrist.  It can lead to pain, numbness, and tingling in the hands.  Advanced symptoms are muscle weakness in the hands, muscle atrophy (shrinking), especially of the thumb pad;  and loss of motor coordination in fine dexterity skills, like buttoning a blouse.

The three main nerves that are responsible for controlling the arm are the ulnar, median, and radial nerves.  The median nerve, like its name implies, travels down the middle of the arm.  It passes through the carpal tunnel  which is just above the crease in the wrist before splitting into branches that go to the thumb, index, middle, and inner half of the ring finger.

The carpal tunnel is a small diameter hole formed by the wrist bones and the transverse carpal ligament.  It contains the tendons that flex the fingers (flexor tendons), and the median nerve.  Pressure as light as a penny can adversely affect nerve tissue, so any pressure increase in the carpal tunnel will over time injure the median nerve.

The most common cause of increased pressure in the carpal tunnel is thickening of the flexor tendons due to long term repetitive use of the fingers such as in typing.  Over time the tendons press the median nerve against the rigid transverse carpal ligament.  The nerve loses oxygen and it starts to malfunction.  Left alone, the damage will be permanent as nerves have a limited ability to regenerate.

Other possible causes are prior injury to the wrist that narrows the carpal tunnel and arthritic or other pathological changes in the wrist bones that cause them to occlude the tunnel.

Pregnancy and thyroid conditions may mimic symptoms of carpal tunnel syndrome.

TREATMENT:

Scars from carpal tunnel release surgery. Two ...

Image via Wikipedia

If the symptoms are advanced (pain, numbness, tingling especially at NIGHT and loss of hand coordination and muscle atrophy) see your doctor.  The doctor should refer you to a hand specialist who may order a nerve conduction test to diagnose carpal tunnel syndrome.  If your test is positive, you may be referred for physical therapy, which will involve mostly stretching and hand exercises.  If that doesn’t work, you may be offered a cortisone injection and exercise prescription, a wrist brace and orders to avoid prolonged hand usage.  The last option is carpal tunnel release surgery, where the transverse carpal ligament is surgically cut to relieve pressure in the tunnel.

If your condition is not advanced, do the following:

If your job or hobby requires lots of finger and hand activity, there is a good chance that this is the cause of your symptoms.  Check your work station set up and ensure the following:

a.  Keyboard should be low enough so that your fingers are at the level of the keyboard when:

  • your upper arms and shoulders are relaxed; your upper arms (above the elbow) are to the side of your body almost touching;
  • your elbows are bent 90-100 degrees
  • your wrists are straight or even bent slightly downward

The most important part is having your shoulders relaxed.  To see if you are doing it right, using your right hand press the top of your left upper shoulder, from the neck down to the shoulder joint.  It should be relatively soft.  If it is not, you are unconsciously contracting the neck and upper trapezius muscles and lifting the arm.

If you find you can’t accomplish the above, due to your desk being too high, you need to get an adjustable keyboard tray and install it under your desk.  Place the keyboard on this tray and lower and angle the tray so that you can meet these requirements (see video below on how to do this).

b.  The top 1/3 of your monitor screen should be at eye level.  Use phone books or a monitor lift to get it to this position.   Place the monitor close enough that you don’t  have to bend your neck forward to see text on your screen, or adjust your screen settings to magnify the text.

c. The mouse and frequently used equipment should be close so that you don’t have to reach forward for them.  Your keyboard tray should have an attached mouse pad; use it.

d. Remember to keep your head in a position where your ears are directly over your shoulders.

e. Every few minutes, relax your hands and wrists for 20-30 seconds.

f. Every hour do the wrist, neck and shoulder exercises in the video.

g. When symptoms are gone, you can do wrist strengthening exercises.

Exercise for Thoracic Outlet Syndrome

The thoracic outlet is an “opening” at the base of the neck, on both sides, where the nerves and artery that service the arm on that side exit through as they descend into the arm.  It is formed by the anterior and medial scalene muscles, the first rib, and the clavicle (collar bone).

If the thoracic outlet narrows in any way, due to one or more of these structures, neurovascular compression is possible (compression of the nerves and artery).  This can result in shoulder pain, neck pain, weakness in the affected arm and hand, numbness and tingling in the arm down to the hands, especially the last three fingers; and in some cases swelling of the arm.  Carrying something like a heavy bag on the affected shoulder makes the symptoms worse.

In thoracic outlet syndrome there is usually a history of prior injury/trauma to the shoulder girdle, such as a car accident or sports injury.  People with long necks and long arms are said to be more predisposed to this condition as the weight of the arm and length of the neck tend to put more stress in the thoracic outlet area.

Left alone without resolution, it is possible to develop permanent nerve damage resulting in chronic pain, weakness in the arm and hand, and reduced sensation in the inner arm area.

What to Do if You Suspect You Have Thoracic Outlet Syndrome

If you suspect you have thoracic outlet syndrome, see your doctor or an experienced chiropractor.  There are some simple orthopedic tests that can be done to see if you likely have TOS.  An MRI study can help visualize the thoracic outlet and identify if there is swelling; and needle electromyograph (EMG) can determine if the arm muscles are getting the proper amount of nerve flow.

If the diagnosis is confirmed, physical therapy exercises are usually prescribed to help open the thoracic outlet space.   In some cases, imaging studies show a fibrous band  responsible for compressing the neurovascular structure; in these cases surgery may be an option.  This involves the scalene muscles — three, short muscles that connect the lower neck vertebrae to the ribcage.

In the meantime, try doing this exercise.  It is designed to create more space between the collar bone and the ribcage.  If this is where your compression is occurring, it may help.


Receive a FREE, 30-Day Plan to Boost Your Health and Eliminate Pain!

Receive a FREE, 30-Day Plan to Boost Your Health and Eliminate Pain!

As a subscriber, you'll also learn the special methods used by experts in human biomechanics to fix body aches and pain the RIGHT way, long term. 

We'll also send you a Free eBook, Concepts of Self-Healing as a way of saying thanks.

Please check your email in 5 minutes to access your Special Report. Make sure to whitelist "newsletter@painandinjurydoctor.com" in your email client (Gmail, Yahoo, Outlook, etc.) so that you don't miss this valuable information. One way is to add this email to your email Contacts.